Craft Projects… What do you make?

While scrapbooking, and to some extent card making, take up the majority of my crafty time, I also like to dabble in other crafty creations. Today I’d like to share some of those ideas with you, starting with my latest video on creating a door hanging sign. The good thing about the majority of those projects is that I use my paper crafting supplies and skills to bring them to life.

You can see a version of that sign in the video thumbnail above, but here is a better version.

I made this project as a challenge for the CKC group. While I was working on the project I started reminiscing about past projects. As I was pulling some of those photos to include in my YouTube video I really felt that blast from the past. Some of the projects I cringed at now, but some of them have been total favorites. I think that is how crafting goes in general, right?

At any rate, here is a gallery of some of those older projects. I’ve captioned them so that you know what they are all about.

Birthday Snow

We haven’t had more than a dust of snow this winter, which has been a big disappointment. We always look forward to at least one nice blanket of snow each year. So when we woke up this morning, on my daughter’s ninth birthday, to find a fluff of snow we were all happily surprised. Birthday snow! It isn’t a blanket but it sure is better than the whole-lot-of-nothing we’ve had this winter! And it made a great photo op.

Valentine’s Day goodies

My kids’ homeschool group will be having a Valentine’s Day party next week so I thought we should get to work on their “cards.” Most years we (I!) really do just make cards. But this year I wanted to do something that would be a little less time consuming. I was inspired by three things this time around.

  1. Paper Crafts Magazine did an article about making photo Valentine’s and I though that would be a great time saver to just print multiple copies, trim and go. And I’d save even more time since I wouldn’t have to sit down with three kids and get them to write their names on each of 30-40 cards. It is obvious who the card is from by the photo! Whew. Big time saver!
  2. Creating Keepsakes Magazine did an article a while back on using the white space in photos to journal on. I had my kids purposefully create me some white space to write our Valentines day message. I just cut the largest heart I could with the Plantin Schoolbook cartridge on my Cricut and had them hold it while I took their pictures.
  3. Finally, The Paper Variety gave us this little photo to draw inspiration from.

So using all those inspiration pieces I came up with the above goody bags. I photographed each child holding up the heart and cropped the photo to 4×3 so I could fit two up on a 4×6 print. I then overlayed the heart with our message in a font called Plastique. I then cut some brackets on my Cricut (Blackletter cart) and ahered to the photo. Then the photo is placed on a topper card that is cut to 4.25 x 5.5 and folded in half. The photo extends above the topper card but I like it that way.

Enjoy!

Craft Room Decorating & My Pink Stamper Challenge

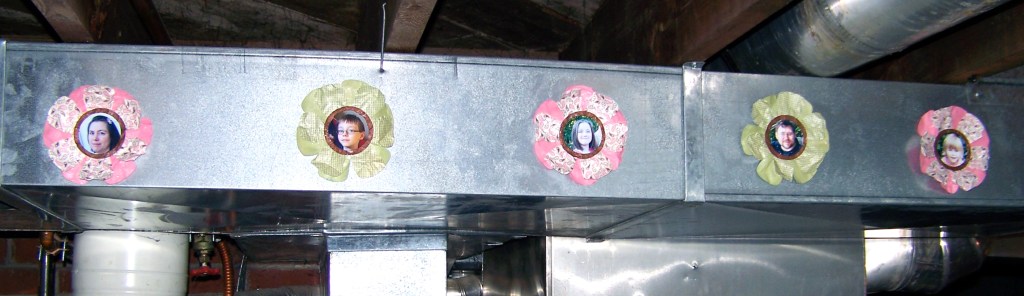
Hey everyone. I wanted to share this project with you today. I made these sweet photo flowers for two reasons. The first is that I am on a mission to decorate my craft space. Since I work in the unfinished basement I don’t have the prettiest of spaces. As you can see here, my craft table faces the furnace and water heater. I LOVE my space but I am getting tired of looking at the utilities. So, I’m starting to do something about it! Then today Robyn, over at My Pink Stamper, posted a message saying she is looking for 2 members for the next term of her design team. In order to apply for the position I have to create an item following her challenge: use the cricut and the colors of pink, green and brown. So I decided to create a room decor item to spice up my space. Keep reading and I’ll show you how I made these flowers and give you some ideas of what else you can do with them!

Recipe

  • cardstock: Bazzill and Stampin’ Up
  • pattern paper: Stampin’ Up and Hot Off The Press
  • spray inks: Tattered Angels & Clear Snap
  • die products: Circut using Plantin Schoolbook
  • foam adhesive: Therm O Web

Steps

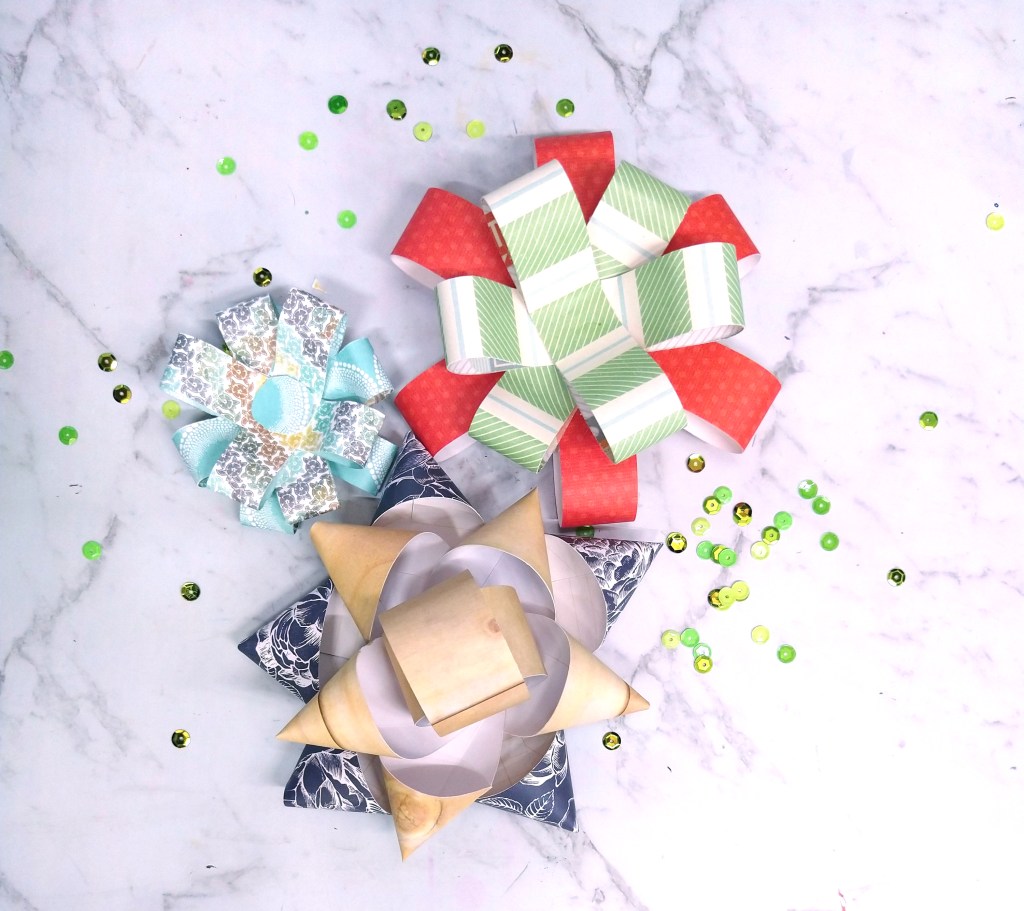
1.  Use the cricut to cut your photos into 2″ circles. There are other ways to do this, but this is my favorite method. Choose photos that have the focal image that is about 2.25″ square. Next, create a template that you will use to line up and cut your photos. To make the template, place a scrap piece of cardstock carefully along the guide edges on the upper right of your mat. This part is important because it is going to help you line up your photos correctly. Load your mat, paying attention to where your mat sits flush when you load it (mine sits more to the left of the little guide bump). Insert your mat, choose the circle from the Plantin Schoolbook cartridge and cut once at 2″ (I used the real size feature to be sure my circle is really 2″). Unload the mat. Carefully lift up the top right corner and slip your photo underneath. Move the photo around until it fits how you like within the circle template. Be sure to trim off any of the photo that overhangs the mat! Lift away the template. Load your mat just like you did when you cut the template, then cut that 2″ circle again. Remove your photo, replace your template carefully on the guide lines and repeat this process for each photo you want to cut.

2.  Choose papers for your flowers. I decided to make the flowers have two layers with a center circle to hold the photo. I chose pink papers for the girls in the family and green papers for the boys with brown paper for the center. Each flower has a solid cardstock as the bottom layer and a pattern paper as the top layer. I cut the flowers at 5.25″ and the center brown circles at 2.5″ again using real dial to be sure they come out the size I expectt. Everything then got a good spray of shimmery inks. While the pieces were still wet I crumpled them up and then smoothed them back out to give them more texture. After they dried I assembled everything, using pop dots to lift up the center of the flower just a bit.

3.  I decided to mount these flowers on the edge of the furnace ducts. The sheet metal of the ducts will act as a nice backdrop for the flowers. I used one of my favorite products, 3M Command Hooks velcro-type strips, to attach the flowers to the ducts. That way if I get tired of the flowers or the placement I can remove the 3M strips from the items and move or replace them. The 3M strips have a removable adhesive that can be replaced with refill adhesive strips. Below you can see what the strips look like and how the look mounted to the ducting. And finally you can see how all the flowers look all lined up.

If you don’t have ugly ducts you need to hide, you could mount these straight to a wall, use them in a scrapbook page or how about this idea… Attach each flower to a colored craft stick and add a leaf (also from Plantin Schoolbook). Then stand all these in a shallow vase with foam in the bottom. Add a ribbon to the vase and display this never-wilt bouquet!

I hope I have inspired you to create some home decor item! And I’ll keep you posted with photos as I add on to my furnace camouflage project!

What I worked on this week…

This week I worked on my Book of Small Thanks. If I were more organized you would have had this idea BEFORE Thanksgiving. But I am who I am! I had this book in mind for about a month but had neither the time nor the supplies I needed until late last week. I rushed to throw it together (and it still isn’t done). I wanted a book where our family of 5 could keep track of the daily, ordinary things. I’m not talking about the big things either, like family, a warm home and food on the table. I am very aware everyday of those big things. I wanted this book to be a moment in time of the things that make us happy right now. It is never too late to make a book of thanks. It is an exercise that you can undertake any time. I hope my project inspires you to make one of your own.

Here is my cover before I did any embellishing to it. I made the whole book with chipboard covered in different papers from the Die Cuts With A View (DCWV) Autumn Stack. The alpha is Thickers (large) and some small letters from my stash.

I formatted the book with smaller inner pages. On the front of the small inner page I plan on putting a photo of each family member. You will notice that the next page is peeking from behind. On the next page is the journaling for each person for each day. I arranged it so that the journaling that shows will match the person in the photo on each and every page.

On the left hand side of the small page I plan on printing and cutting out quotes strips that have to do with thankfulness. I have yet to research what those quotes will be.

And when you turn the small page, the book opens up to see everyone’s thoughts of thanks for that day. I did one day for each weekday during the week of Thanksgiving.

Like I said before, it isn’t done yet. But I had a chance to give the cover some embellishing with leftover ribbons from my stash before typing up this post. Enjoy!

Thanksgiving Wreath

I created this project to take to share with my kids’ homeschool group last week. I pre-cut all the elements on my Cricut (Storybook cartridge) and let the kids (and moms too!) assemble their wreaths as they wished. The wreaths were cut in two shapes: an outer ring shape and an inner solid circle shape. This was really just one cut on the Cricut. I set my Cricut to the center point function, cut a 6 3/4″ circle and then immediately cut another circle at 4 3/4″. This left me with the ring shape and the circle shape. I cut leaves at 2″ (I think) and used the fill page function. This gave me 25 leaves on one 12×12 sheet of pattern paper. Add in a couple of fall sentiment stamps, twine and glue sticks and the project is good to go! A more elegant version could be created using a bigger wreath layered thick with larger leaves of more varied shapes. I think this project would be great too if you add a favorite fall photo to the center. Try this one with your own kids or make a lovely version for yourself. If you make a wreath, post it on your favorite online gallery and share a link to your file in the comments!

NSD Challenge 1: Not a scrapbooker

Okay, this one is for some of my friends who may be reading this. Those of you who don’t think you are scrapbookers. I challenge you to do a scrappy thing. Print some 4×6 photos. Make some 4×6 cards out of some pretty paper, any paper. Write some notes on that paper about your photos. Slide them into a photo album that has individual 4×6 photo pockets. Done. Now don’t you feel like a scrapper?

Remember, photos only tell part of the story. Add your words, it makes the story more complete and preserves it for the future. You never know who may look at your photos down the road!

Remember to post your project to your favorite online gallery and leave a comment here with a link to your post. I’d love to see your project!

Recipe:

  • cardstock: from stash
  • journaling tags: Luxe

Entering Contests

These past couple of months have been the beginning for me of trying to get my work out in the public eye. In an earlier post I said I was able to have one layout featured on a popular blog. That is a start! I’ve also tried to get a short design team position as well as entering a card making contest. Neither adventure turned into anything, but it sure was interesting trying. Here are some of the projects I used for the two contests.

If you have ever thought of publishing your work, don’t be afraid to try. The worst thing that happens is that you spend a little time and money on your work and they say no. Its not the end of the world!

Here was one of my entries for a Cricut-based blog’s short-term design team. I took a shape from the Storybook cartridge and turned it into a photo frame by cutting and gluing multiple layers of cardstock together. The final layer had the frame cut out of it and decorated with pattern paper.

The card making contest had 5 themes to enter. Here are three of my 5 entries…