Scrapping the hard stuff

My son got infected with E. coli from contaminated food when he was 6 years old. He spent a month in the hospital, including almost a week in ICU due to complications from the infection. It is hard to think about it. It is even harder to type it down here in public. And for the last 6 years since he was released from the hospital I have been meaning to capture that story for his scrapbook.

I’ve had several difficulties in completing this task. In the beginning it was just to fresh and raw. After time passed, I then had the trouble of feeling like I wasn’t going to “get it right.” And while I was dragging my feet I had a computer crash and it looked like I lost the electronic journaling I had done during the experience. Luckily my husband had saved a “snap shot” of my hard drive and yesterday was the day I decided to look at that data and try to find my journaling. I cried a little when I realized that my searching was working and I finally recovered my notes!

What made me decide it was time to work on this? It has been a dozen factors. And the final push was this challenge from The Paper Variety.

I knew it was finally time. Having recovered my original notes from that trial made my determination that much more. I was going to capture this story before it got lost again! I ended up with 20 pages of journaling and decided this story had to be put into it’s own album. Due to the personal nature and the unpleasant details I thought a “mini” album that could be tucked away on a shelf was the right choice. I have for you just the cover of the album. All my details are stored away for just me and my family.

I really struggled with how to approach this project artistically. I knew all the “cutesy” medical products out there weren’t going to capture the emotions of that time. I decided to just get raw and messy and muddled and harsh because those were all the feelings we went through. I printed my journaling straight out on cardstock with  edits for spelling and a few for space. I printed all my photos straight out of iPhoto with no edits or adjustments. I almost always crop, reduce red eye or make other adjustments. Not for this project. I just wanted this to be true and complete. I’m so glad I bothered to take these photos while he was sick. Some people might think it morbid to take photos of a child hooked up to life support machines but for me it was, and still is, therapy.

I hope my sharing this very personal story will encourage you to get a difficult story scrapped.

Weekend update #6

Okay, here is my final update of things I worked on this past weekend. Since our plans were canceled on Sunday due to weather, I had plenty of time to craft. I spent all day Sunday in my basement craft room. If any of you have been following my blog, I have been working on sprucing up my basement craft room. My work table looks out onto the furnace and water heater. Not the most inspiring sight! I spent some time in a previous post putting up some decorations to hide the furnace ducts a bit. I finally got to hanging the curtain I planned to use to hide the actually utilities! Since I am going for a Cafe theme in my space I added a scalloped “awning” to my curtain. Both pieces came from sheets I bought for really cheap at the Goodwill.

This is the view as I walk into my space.

This is the view as I am sitting at my table.

I plan on adding several metal chians (attached under the scalloped piece). I can hang inspirational items from these chains such as finished layouts, magazine clippings, mini art pieces, and other things. As I build up my decor palette, I’ll post more pictures!

Weekend update #5

I don’t use many coupons, but the ones that I do used are shoved in a wad in the bottom of my purse. This situation has needed some work for a while. So I decided to craft my own coupon holder. It is chipboard front and back (identical) with an open accordion folded cardstock center. The whole thing is held closed by a spiced up rubber band. Here is what it looks like.

Recipe
chipboard: Bazzill
pattern cardstock: Scenic Route
dry embossing tools: Sizzix
inks: Stampin’ Up, ClearSnap
embossing powder: Stampin’ Up
stamps: Scraptivity, Technique Tuesday (alpha)
alcohol ink: Ranger
other from stash: flower button, metal button, ball chain, ribbons, rubber band

Steps

  1. Cut two pieces of chipboard to 6 x 3.5. Dry emboss texture, add distreesing ink and texture stamps.
  2. Cut pattern cardstock to two sheets measuring 12 x 5.75. Score every 3.25 inches along the length. This will leave you with a tab at the end that is smaller than 3.25. Overlap this tab with the tab of the second piece until it equals 3.25 inches. Adhere together. Accordion fold whole piece.
  3. Lay front of chipboard face down on table (be sure the top is actually the top! Attach one end of accordion piece to center of chipboard. Be sure the side you like best of the pattern is facing up. Fold entire thing flat. Apply adhesive to back of accordian and adhere to the back of final piece of chipboard, being sure to line up edges with the bottom piece of chipboard.
  4. Alcohol ink (optional) a plain rubber band. Add ribbon & do-dads to liking. Use to secure coupon book closed.

Mine only has a few deviders because, like I said, I don’t use many coupons. If you need more dividers, just add more strips of scored cardstock in step 2 before adhering everything together. If you give this a try, I’d love to see it!

Weekend update #4

Okay, I am getting most of the projects done that I had floating around in my brain. I’m thinking I am going to spread these posts out a bit this week so that they don’t get overwhelming. I hope I don’t annoy anyone with over-posting! Here is a quick little project that I wanted to do.

What is it you ask? It is a tiny, double-sided tag that I made for my sewing machine. Since I am a sewer I use my machine for both paper and for fabric. I use different needles for the two tasks and find myself forgetting which needle I last used in the machine! I made this little tag to leave under my presser foot to remind me which needle I have installed. I use the “F” side for fabric needles and the “P” side for paper needles. Before I was just using a scrap piece of paper with a big “F” and “P” on either side . This is going to make me much happier! Here you can see it in action.

Recipe
ink, cardstock: Stampin’ Up
stamp: Scraptivity (an old stamp I almost got rid of, silly me. I think I’ll be using it more often for texture on projects!)
sealant: modge podge
ribbon, pattern paper, alpha: stash scraps

Steps
I made my tag a-la Tim Holtz. I put a couple of drops of dye ink from 3 different colors onto a plastic sheet (leftover packaging!), misted, swirled a bit and then dragged my tags through the pool of color. Then gave it some distressing by inking the edges and stamping with some cool texture. I finished the whole thing off with a layer of modge podge for added durability (and another layer of texture dimension that isn’t showing up on camera).

If you need a label for something you keep forgetting, give this little tag a try.

Weekend update #3

I needed a bunch of thank you cards for my daughter’s birthday party from last weekend. I decided that it is more economical, both in time and money to make smaller cards. So this time I am showing you a set of note cards that measure 4.25 x 5.5 (that is 4 note cards out of a single sheet of letter size cardstock). I left the cards with no sentiment so the extras can be used for any purpose.

Because we are pretty close with all of the party attendees, thank you cards can be a bit redundant. However, I still like the process of having my kids reflect for just a couple of minutes on who gave them what after the whirlwind is all over. It is also a time to think over all the new do-dads and consider why each one is appreciated. I hope this process makes it more than just a pile of loot for them. And of course, I get to make pretty cards; can’t forget to mention that! So here are my pretty cards for you.

Recipe
white cardstock: Wausau
ink, stamps, vanilla cardstock: Stampin’ Up
dry embossing tools: Sizzix
ribbon: Cream City Ribbon

Weekend update #2

I have so many projects planned for this weekend and here it is Sunday early afternoon already. I don’t think I am going to get them all done. Well, here is the next one for you. I’m hoping I’ll have some more by this evening. We’ll see how it goes.

This one is for the Paper Variety weekly challenge. This time it is to use stitching (machine, hand or faux). Since I am a sewer this one was easy for me! I decided to use the stitching as a focal point instead of just an embellishment on something. So I made this cheery card. Enjoy!

Recipe
cardstock, inks, aqua painter: Stampin’ Up
watercolor paper: Strathmore
liquid applique, marker: Marvy
thread: Coats and Clark (multicolor thread)
craft stick:Forster
metallic ink: Tsukineko
other: sealant spray

Steps

  1. Cut watercolor paper to card-front size (here 4×5.25).
  2. On back of watercolor paper, draw rainbow lines going in the opposite direction you want the finished rainbow to be.
  3. Stitch over your lines with a multicolor thread. This will give an interesting effect and prevent you from needing to change threads for each arch.
  4. Cut a cloud shape from water color paper and apply liquid applique in a thick layer. Allow to dry over night. Heat with a heat gun to get the bubbly raised texture. Add gray watercolor highlights.
  5. On front of rainbow card-front, add water color detail to sky.
  6. Hand cut sun, add watercolor detail and apply to card-front. Layer cloud with pop dots over sun.
  7. Roll craft stick in metallic ink and seal (that ink rubs off if you don’t seal it!). Allow to dry.
  8. Hand cut flag, add sentiment and ink edges.
  9. Apply craft stick to card with glue. Add flag with pop dot.
  10. Adhere card-front to folded card.

Weekend update #1

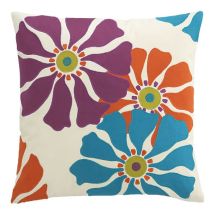
I’m going to have a few updates for you this weekend. This first one is a Moxie Fab World Tuesday Trigger challenge to use the photo above to create some piece of paper goodness. The very first thing that came to my mind was a card. But I decided to think on it a while and go for something different. As my mind worked the flowers began to bring up other associations for me. I landed on the idea of IKEA. Those flowers are funky hip and it reminds me of many things in IKEA. As my mind worked on it some more I thought of all the funky lampshades IKEA has. I wanted to create a lamp shade, but not-a-lamp-shade and I came up with this hanging piece. It is just something to hang in a room to bring it some spunk. I used the Moxie Fab trigger photo both for this indirect inspiration and for the color palette and a big funky flower.

I tried to get some better lighting and photographs for you all, but no such luck. I’m still working on my photo and “studio” lighting so that I could get great pictures of my projects. The orange of the flower really is closer to the color of the ribbon than this photo makes it look. And the glitter edging the flower is a nice green color, not this dull edging it appears. Guess there is always something to work on in life.

I may put this piece along with a second companion piece up on Etsy. Or I may add some other funky decor items and donate them to a silent auction to benefit a homeschool charity. I’m not sure yet. I know they won’t stay with me since this really isn’t my style! LOL. I’m just not a funky, hip girl.  But it is kind of fun to play outside of the box once in a while.

Finishing 2010

Sheesh. I finally got to finishing the last two layouts for my kids scrap calendars. I just wasn’t feeling motivated to get them done. But I finally found the energy. Part of the problem was that I didn’t really know what I wanted to do with the photos for my son’s layout. Then I saw the current sketch over at Sketch Inspiration and thought that it could work. And while I was working on my son’s layout I decided to just go for it and finish my daughters. I kept everything really simple so I could just get it done. It feels good to finally get those all wrapped up!

Challenge Card

One more post for you this weekend. I am still going strong with creating for challenges. This one comes from two challenges:

  1. the Moxi Fab World Tuesday Trigger about comfy cozy. I used the fabric & colors from this image.
  2. The Paper Variety sketch for this week. I used the general layout and theme from this sketch.

So here you go…


Recipe:
cardstock, twill tape, punch, ink: Stampin’ Up
stamp: Technique Tuesday
buttons: Buttons Galore
pattern paper: stash

Showing off

I’m gonna show off in this post. This layout is all about how I made my own wedding dress.

I learned to sew in high school and took to it right away. I made several clothing items and at the end of the year I made my prom dress. Years later when I was getting married, I decided to make my own wedding dress. It was a wonderful experience. I really had a lot of fun doing it (despite the fact that my sewing machine died right in the middle of things!).

I’ve been married for almost 17 years and these are the first photos from the wedding that I have scrapped. All my photos are tucked into a photo album since those pictures were taking in my pre-scrapper life. Someday I will get to scrapping a few more of them. But for now I was feeling motivated to scrap something I feel very proud of.

Recipe:
pattern paper: Cosmo Cricket, October Afternoon
vellum: Stampin’ Up
alpha: Jenni Bowlin, October Afternoon
punch: Fiskars
paper tape: 7 gypsies
stamp: Technique Tuesday
bling: Want2Scrap
markers: Marvy
paint: Delta
inks: Ranger, StazOn

This layout was inspired by two things. First I used a sketch from Sketch Inspiration and I also played with “get darling with decorative tape challenge” on Moxi Fab World. I took the large background heart from the sketch and worked it with decorative tape. I also recolored the same decorative tape with alcohol ink and made some flowers. I’ve been using more and more tape on my layouts and I am really loving it.