CKC: February Layouts

At the Creating Keepsakes Convention I packed supplies to work on my kids calendars for the months of February and March. Here is what I came up with for February

First we have my oldest daughter’s page. I saved tags, buttons and other tidbits from a couple of her fashion shopping excursions to use on a layout. I think they fit perfectly here to capture the things that I see I see in her that are in between being a little girl and being a teen. It was a great photo and journaling for her ninth birthday.

My son’s layout came out of one of the CKC classes I took focusing on using sketches. I took the sketch and the supplies provided to create this layout. I had this photo of my son in the back of my mind when I made this project in class so I used a larger amount of orange pattern paper and kept the pink to a minimum accent. The pink works on this boy layout since my son is holding a glass of pink “snow cone.” When I made the project in class I left off the recommended title and added in my own titling later. Don’t be afraid to mix it up, even when taking a class. If something different works for you, then go for it!

And finally, my youngest’s layout. I used pattern paper that came in my goody bag at the evening crop at CKC. I didn’t have any plan for this layout going into the evening, but when I saw this energetic paper I thought it would be great for the photos of my daughter “building” at the science museum near us. The paper was a very stark contrast and I inked the paper just to tone down the white a bit. This is one of my favorite techniques to use paper that otherwise is just a bit to bold or busy. If you tone it down, you can make it work. You don’t have to stress out over layouts, just use what you have on hand.

CKC: Prize + Copic

Every year (I think) I have won a prize attending my local CKC. This year I had gone all weekend long without winning anything. I figured my winning karma had just run out. As I was packing up my things to leave after the Saturday night crop, they announced that they were just going to draw for all the remaining prizes. I decided to stick around just in case. It is a good thing I did since I won a very lovely floral stamp set from Close To My Heart! So excited. I used it to play with my brand new Copics to create this card.

I drew outside of the lines on purpose just to experiment with what I could and could not do with my Copics in the color range I purchased. Just fun and play!

Recipe:
cardstock: Stampin’ Up, The Paper Company
stamp: CTMH (flower), SU (sentiment)
markers: Copic
ink: Versamark, Tsukineko (Memento)
ribbon: Cream City Ribbon
punch: SU

CKC: Paper Variety challenge

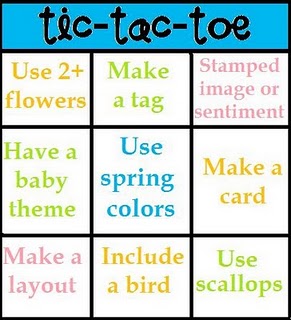
I took my Paper Variety Challenge and some sketches with me to my Creating Keepsakes Convention event this weekend to use during the open crop time. Here is what I ended up doing with Paper Variety’s Tic-Tac-Toe challenge.

I used the far left hand column and made a layout using some flowers about my youngest daughter’s first birthday. I packed really simply for the crop and will tell you about that in a later post. The tags I made using my Cricut/Gypsy and I cut a ton of them to keep in my stash. I packed a whole handful of these tags to do different things with. Yes tags are widely available but I didn’t have any so I just made my own. Know that you can make lovely pages without spending a ton of money but packing simply and making your own embellishments when you need to.

Recipe:
cardstock: The Paper Company
pattern paper, cardstock stickers, small alpha: Echo Park
title alpha: American Crafts
ink: Ranger
die machine: Cricut/Gypsy (tags)
flowers: stash

CKC: Copics

I took two Copic marker (pronounced coe-pick, not cop-pick) classes at a Creating Keepsakes Convention in my area. I’ve had Copics on my wishlist since seeing them on Scrap Time. Since then I’ve seen and heard much about them. I thought I would share with you what I know and some resources to learn more.

Copics are alcohol based markers and…

  • Come in 4 body styles: Copic (original), Wide, Sketch and Cio. Differences between these include marker size, ink volume and marker convenience. Sketch and Cio are most popular with stampers and scrappers due to the brush tips. Ciao are slightly less expensive because they are smaller, hold less ink and do not have the nice marker design features. Sketch are nicer in that they are a rectangular body to prevent them from rolling around on the table. They also have caps that have the color printed directly on the cap. This is a HUGE time saver when looking for markers.
  • They are refillable and have very durable nibs. And if your nib is damaged somehow, then the nibs are replaceable. This makes these markers a life-time purchase! Never throw away another marker!
  • They are guaranteed not to dry out for 3 years. And if they do dry out they can be refreshed. Did I mention, never throw away another marker?
  • They can color on paper, cardstock, chipboard and other paper products
  • But unlike other markers they can also color on plastics, metal and other non-porous surfaces including buttons, brads, ribbon, glass, transparencies and much more. Since Copics are alcohol based they color on paper better in many ways than water based markers. The colors can be blended seamlessly and without leaving heavy streak lines like water based markers.
  • Due to the alcohol based nature they blend more smoothly than water-based markers (depending on your surface!)

You can see some info on Copic techniques from Scrap time. I love Christine over there and think you should check out her Copic and other videos.

  • How to start inexpensively with Copics by using a palette blending method. Episode 98.
  • How to use Copic to blend colors for shading & dimension. Episode 371.
  • Another blending and shading technique using a palette. Episode 612.

I took my class from Clear and Simple Stamps. You can find their basic photo color blending tutorial on their site. They do have a video tutorial but I found the sound quality poor and couldn’t finish watching it. Also, search YouTube. There are dozens of videos.

My initial thoughts after taking the class

  • Like them way better than water based markers and bought a full range of colors.
  • Love the fact that they will last forever. I won’t ever throw away another marker!
  • I think they are more versatile since they can color on many more surfaces.
  • It will take some experimenting to find just the right paper and stamp ink to use for color stamped images. The marker ink can cause some stamping inks to bleed. Never use them with StazOn which is also alcohol based.
  • Different cardstocks will absorb the ink in different ways causing the ink to feather outside of your intended images. This is especially frustrating if you are coloring in stamped images. My Stampin’ Up cardstock is “not recommended” by some resources, yet I had the best luck with it not feathering/bleeding. Go figure. (I heard that it absorbs more ink so it will run your markers dry faster. Who cares if it actually works!)
  • Don’t trust the plastic cap colors. The actual marker color can be quite different. It is best to buy them in person or in coordinated color sets (like Clear and Simple Stamp Trios) until you know what colors you actually want.

I am planning a bunch of sample swatches to test different stamp inks and papers. I plan on showing it in a video since it would take way to many photos to go over all the details. When I finish it I will share it with you.

Two cards

I’ve been busy getting myself ready for the Creating Keepsakes Convention in my region. I will have plenty of goodies to share with you on Sunday or Monday. For now, I’ll give you the last two cards I made.

This first card I made for my SIL’s birthday. I didn’t have the stamp I wanted to I actually cut the “r” off of a “for” stamp and added on to the end of the “you” stamp to create “your”. I cringed as I sliced the scissors through my cling-mount rubber. But everything worked out just fine. When I cling my stamps onto my block I can just add the “r” back on to it’s original word and it will look just fine! If a stamp isn’t quite what you need, don’t be afraid to alter it!

This next card was made for my friend’s son’s birthday. He is an animal lover so I wanted to go with a wild animal feel without being too cutesy since he is 11. I used my alcohol inks on glossy paper to get the marbled background.

Enjoy! And I’ll be back in a few days with tidbits from CKC!

Anniversary card

I took this week’s Paper Variety challenge – a page sketch – and turned it into a card. Here was the original sketch

I removed most of the elements on the left side of the sketch to scale it down for my card size.  I also replaced the pennants with a banner so I could add an additional message there. When using sketches, feel free to remove items that you don’t need and change elements into items that will work better for your layout.

Recipe:
cardstock: Stampin’ Up, SEI, Wausau
stamps, ink: Stampin’ Up
rubons: Fancy Pants
glitter glue: Ranger
wire: stash

January layouts

Here are my kids scrap calendar pages for January.

For this one I kept things simple. I added texture to the carstock using a piece of old plastic fencing and some Glimmer Mist. I stamped the fruit images on pattern paper to give them more texture and depth. Finally I used Staz On to tone down unimportant ares of the photograph that were distracting from the focus. These are all easy tips you can use on your layouts too!

Recipe:
cardstock, stamps, ink: Stampin’ Up
pattern paper: stash scraps
journal stickers: October Afternoon
alpha: stash
spray ink: Tattered Angels
other: stitching, plastic fencing as mask

I thought I had shown you this next one already but I couldn’t find it in my image gallery. So here it is. For this one I used a sketch from Sketch Inspiration. In order to balance some poor photos I added a clear photo of my daughter’s face. To enhance the subject (her love of archeology) I used paint. I’ll have to admit that it was a bit more paint that I intended, but I think it works just fine.

Recipe:
pattern paper: Scenic Route, Fancy Pants (I think)
paint dauber: Ranger
punch: Stampin’ Up
stamps: Technique Tuesday
ink: Staz On
alpha rubons: stash

And this one you’ve seen before.

Unexpected Scrap supplies

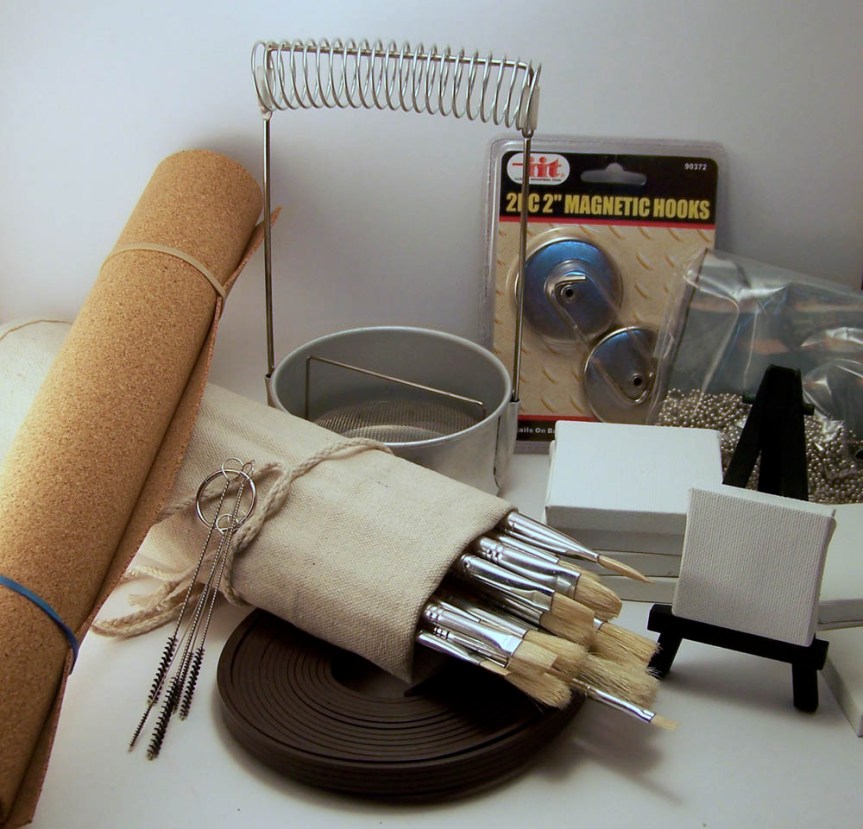
So I found a source of unexpected craft supplies. My kids got gift certificates for Christmas for American Science & Surplus. While my kids were browsing their catalog I noticed a link that said “Arts & Crafts”. Ooh that looked interesting. And boy was it. I explored the arts and crafts section as well as several other sections. I came away with typical craft supplies such as paint brushes and buttons. But I also found some interesting supplies. I discovered a large roll of magnet strip for all those magnet projects. There was a baggy of ball-chain both for storing items and for hanging displays. I was also excited to find mini bristle burshes that I hope to use to unclog Glimmer Mist bottles.

But there were tow real scores for me. I found a roll of cork 12″ x 36″ for just $3. This sheet is perfect for punches, dies or even the cricut! And did you notice that little easel and all those little canvases? How dang cool is that. The package came with 10 small canvases in varying sizes and that easel for $9.50. I see my future full of paint!

Go ahead and check out American Science & Surplus you just may find something you can’t live without.

9th Birthday

I know my blog was quite last week. My craft room was busy though! Here is one project I worked on. It is from my daughter’s 9th birthday. She chose a pool party for the 5th year!

When I started this page I knew I wanted to use the leftover paper umbrellas from the party on the page. I also wanted to incorporate those small photos. Those I took from a cheap under-water camera I picked up a couple of years ago while on vacation (for the pool portion of the party). I actually went to the store in search of real, live film. I haven’t done such a thing in years! The photos came back of poor quality, but it is a fun addition to the party layout.

Don’t be afraid to use less than perfect photos and those party decorations to bring some spark to your layouts!

Recipe
cardstock: stash
pattern paper: Echo Park, scraps from stash
alpha: American crafts
stamps: Technique Tuesday
glue ink: Tsukineko
other: glitter, umbrellas
note: if you are worried about archival quality, be sure to spray the umbrellas with deacidification spray.

Photo Studio

I usually photograph my projects for upload in my basement under fluorescent lights. These photos certainly haven’t looked very fresh. And there are often reflections on the photos from the lighting. When I have sun, which is rare here in the Pacific Northwest, I use the kitchen table sitting in a south facing window. These look better, but have other problems such as having a narrow time frame in which to work. In an effort to take some better pictures of my projects whenever I need to, I searched the web on tips for lighting.

In my search I found a blog called Strobist. I know nothing about this blog other than it had a fabulous idea for a homemade (and cheap!) light tent. He jokingly estimated it would cost $10 to make this. I gave the instructions a try. I managed to scrounge up all the ingredients I needed from stuff I already had on hand and my total cost was $0. Now that is awesome!

Here is his example

And here is what I came up with.

I used a cardboard shipping box (that scrap supplies came in!), some tissue paper from my gift wrap stash and blue painters tape. I scrounged around the house and found a few desk lamps that I could use for lighting. While the Strobist blog post said this is practically foolproof I still find I am having trouble. Part of that is not knowing how to use my camera well. I am getting a heavy yellow color cast that I have to edit away in Photoshop Elements. The other part is that my desk lamps still aren’t enough light. I have light coming from top and one side. I need light coming from the third side as well. The light I am happiest with is the bare 100w bulb in a broken lamp base. If I could have a couple more of these then I think I could get something much smoother. But for now it is far better than what I had before. I will be tweaking over time and let you all know if I come up with any improvements.

So go check out Strobist‘s blog post about the light tent and see if you can craft up your own.