Watercoloring with stencils

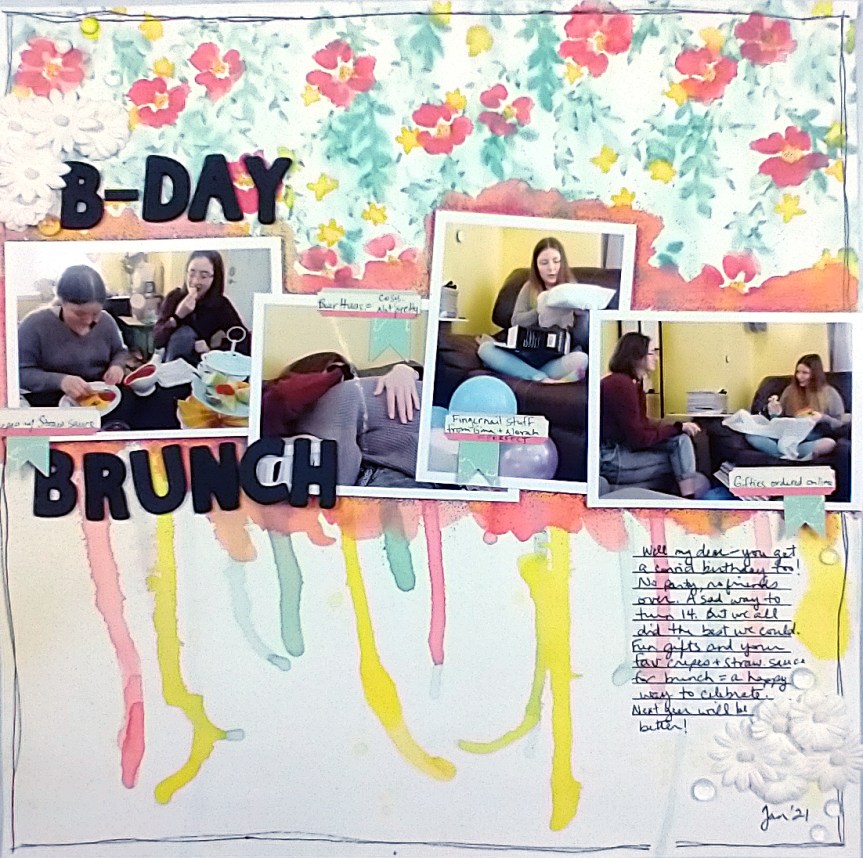
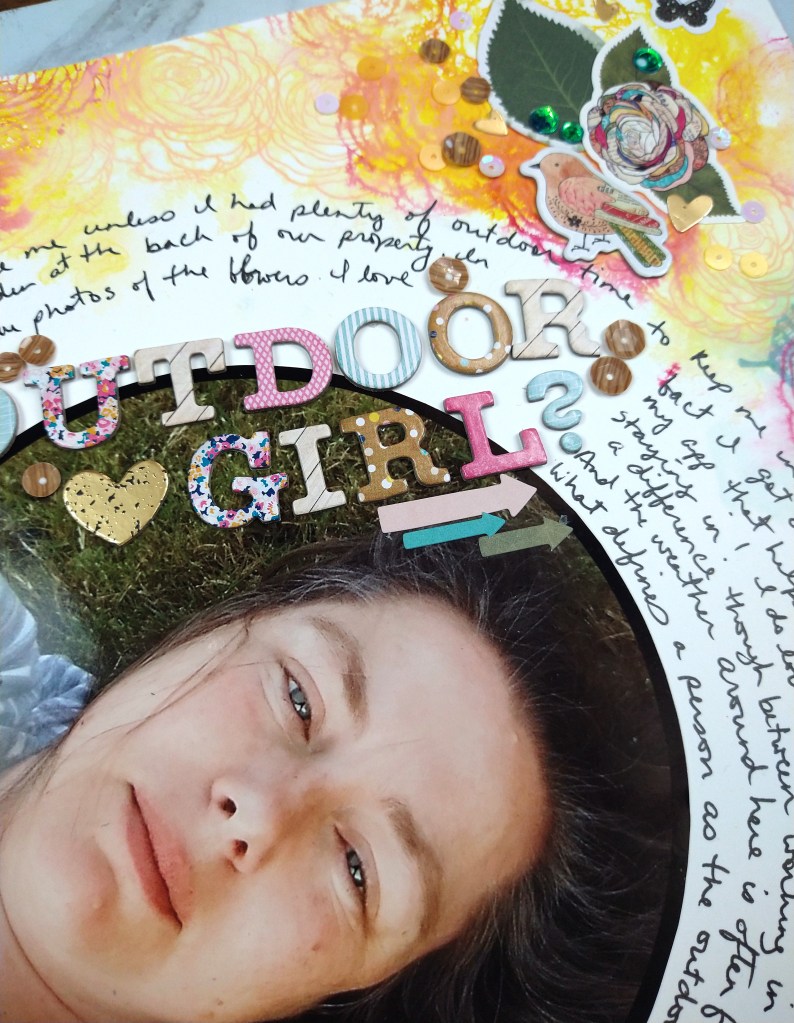
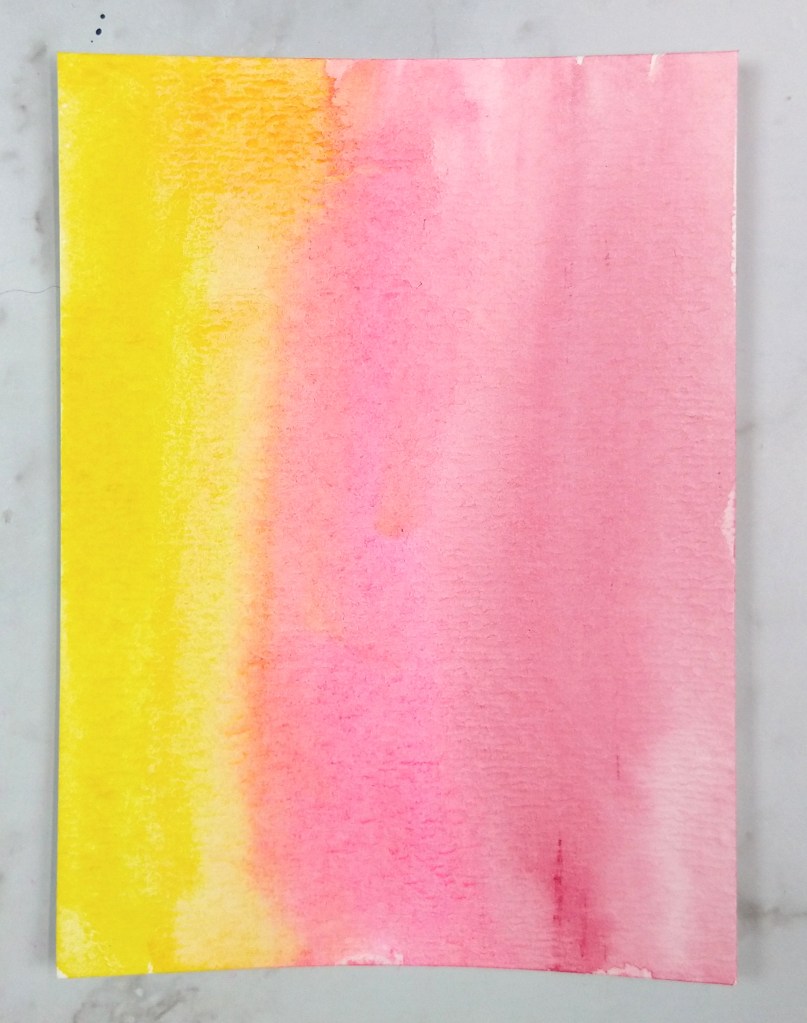
I played along with the Mixed Media Frenzy group YouTube hop again this month. I’ve shared the whole process over on my channel. But if you want some quick tips on using stencils to get a watercolor look I can set you up with some photos here.

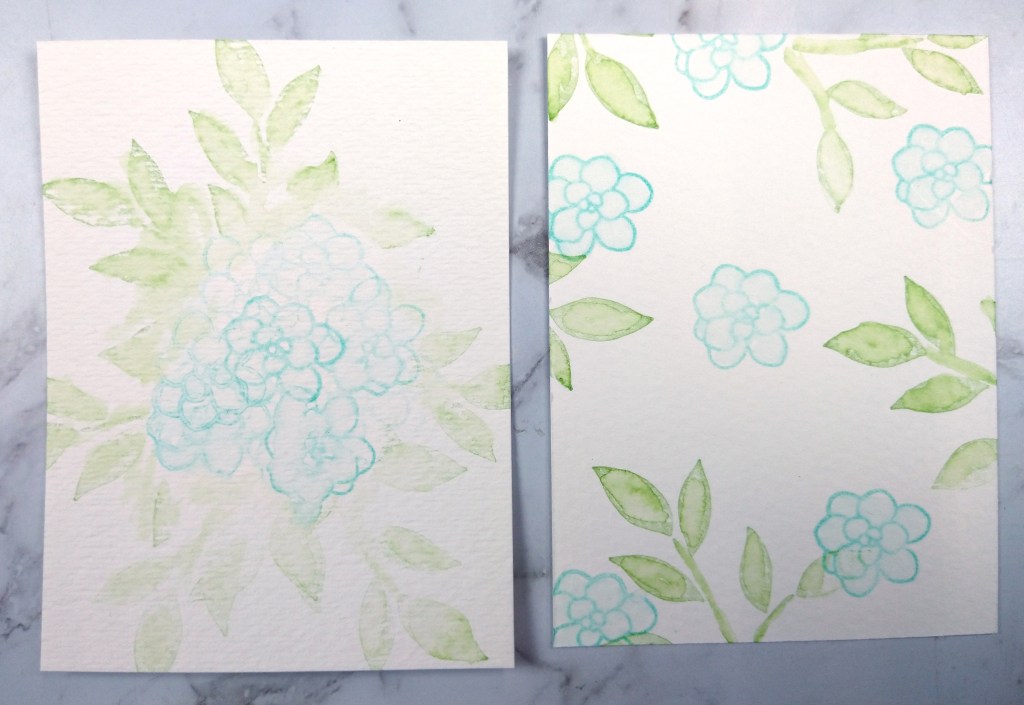
First off, my paper was prepped with gesso. This helps ink release and allows these effects to work to the fullest. For the coloring, I used layering stencils from Pink Fresh studio (available for purchase here). For each layer I used simple, different tips to create watercolor effects.

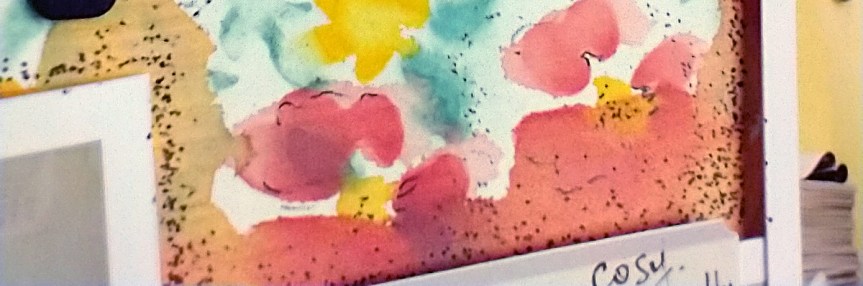
Layer One. Lightest color. Stencil on color. Give a hearty mist of water and tip paper to drip. This will eliminate most of the form of your stenciling and just leave a haze. You can always add detail back in with more stenciling. It is hard to see but there is a haze of color in the background.

Layer Two. Mid tone color. Stencil and give a gentle spritz with water. This will just fuzz out the images. Notice the largest leaf is all blurry?

Layer Three. First flowers. Stencil. Use a watercolor brush to paint over the image with just a little clean water. Stroke outside the lines of the image just a little. This gives a flowy watercolor look. I did add back more detail and depth with a light re-stenciling exactly over the same spots. Can you see the back layer of the flower has jagged edges and a lighter color? The front layer has crisper edges and richer color from the extra stencil work. When you know these little tricks you can get LOTS of dimension and interest.

Layer Four. Accent flowers. Stencil. Use paintbrush to just touch a spot of water to center. This pushes pigment out towards the edge of the image for a gradient look. Really look at those yellow flowers to see how the color changes across the image.

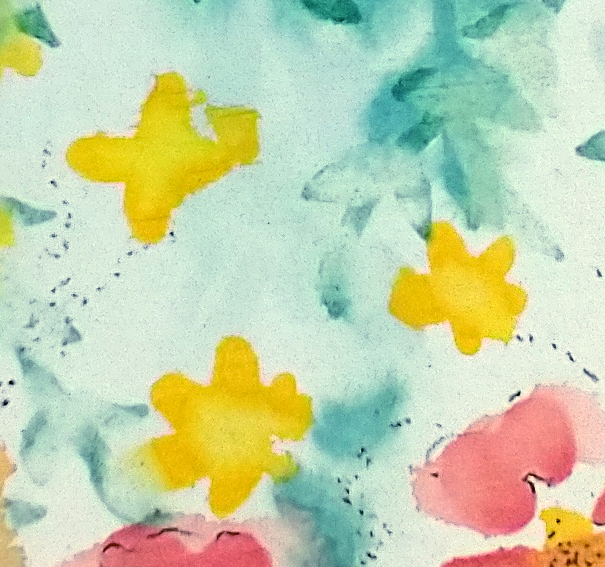
Layer Five. Final foliage layer in darkest shade. Stencil. Wet entire image with a watercolor brush, much like for the flowers. Except this time dab up excess water and ink with a tissue to really tone back the image. Don’t dab up all the water and ink or it’ll be like you didn’t do anything at all. Just a quick tap with the tissue will leave a “splotchy” image that adds texture more than anything. See how only parts of the leaves are fully clear? That adds a lot of texture.

Top off your new painting with some pen work to give just a touch of details and you now have a pretty watercolored background painting and you don’t have to know how to draw a single thing!

July week 2 layouts

I’ve got two process videos up this week for you to check out.

First up I am playing with my Counterfeit Kit for July and using the very (overly!) bold painted paper I created in a previous video. Small doses make it more “friendly” to my senses! Plus you can watch a quick tip on creating DIY enamel dots. (Photos below)


Next up is a mixed media layout using a stamp ink bleeding technique. If you enjoy a bit of artsy ink on your pages, you should give this one a try. (Photos below)

So that is it for this week. I hope you have an artful weekend and I’ll be back soon with more crafty goodness.

Feature Friday

The first Friday of the month I pull out some type of crafty product and play with it. I show at least 10 ways to put that product to use. Here is a look at that video. And if you want the short and sweet version, you can see the photo gallery bellow. But trust me, some of these techniques you’ll want to see in action, like the inked circles with dripping.

Remember when viewing a gallery you can click on each image to see the full version. The gallery view does cut off some sides of the images and you may miss something important if you don’t see the whole picture!

Do you have a favorite? Let me know! Want me to show something you’ve been curious about? Let me know?

Until next time, have an artful day.

DIY small item storage

I’ll admit that I can get a little carried away with organization and storage. But when I figure out some simple and affordable ways to stay organized I get excited and I have to share! So that is what we are dong to do today.

In part 1 of my process I created small trays/boxes that can be used solo, sized to stack, or made with lids. Part 2 shows how to make a drawer system to hold the trays for yet another option.

Download the template guide to help you create these drawers.

Third Mojo Booster

Okay, I’ll admit that my mojo feels like it is back. But I wanted to give one final look at something I do when I’m not quite feeling it and that is to just play. Play with something new. Or play with something old and try to figure out how to use it in a new way. This past week I played with two unrelated things in unrelated ways.

First off I was inspired by a ScrapHappy session over at ScrapHappy.org (you can find a video for every week day in April over on the ScrapHappy YouTube channel full of playful ideas). The topic was alcohol ink and I have been meaning to play with those again. I had bought a class kit with different “papers” to try and I had bought my own Yupo “paper” from my local craft store. And those things have just been sitting in my new materials bin. So thanks to Alice’s session, I got those out and played. And technically that is a fourth mojo booster for you — take a class or find a less formal demo video to play along with.

So check out the pretty colors I created with my inks. Now, was it all a success? No. With some things working and some things not working (for me!) I can better hone in on what I like in order to make wiser choices next time. For example, in these items, the alcohol ink on the glitter paper got toned down way too much and became more pastel. While the look is nice, it wasn’t what I wanted. I like alcohol inks for the in-your-face color they can offer. So I made that work with a different technique.

Okay, moving on to the second item I played with and that was sequins. I actually started this project for my YouTube channel right at the beginning of my mojo dip and I didn’t get it posted on the schedule I had planned. So I had to take a step back and think about where the project was going. I took a look at my pile of sequins and I took a look at some projects and I asked myself a question โ€“ where else could I put sequins besides just sprinkling them on the side. And once I had a question I was able to experiment. And I managed to get the one technique I was the most excited to try to actually work. But it took some playing and some experimentation. And that could have ended up with a frustrating moment, but if I had given up I would never have experienced the success. So sometimes if you keep going and keep pushing, you can break through. Can you tell which technique I’m talking about in my video?

Second Mojo Booster

It is unusual for me to be feeling low in the springtime. I was really surprised that my creativity sort of vanished. And it did so after coming off an exciting card making event that had me super jazzed. So, where did “it” go? I don’t really know and while tracking down a cause could be helpful, turning to tactics to move past this phase is more productive. Last post I talked about using a sketch as a mojo motivator. This time I going to use a scrappy challenge.

I turned to the Counterfeit Kit Challenge blog for some inspiration. They offer crafty challenges on the 12th and 18th of every month to help boost our creativity. And I really needed that. April 12th’s challenge was titled “Al Fresco” and it was about finding inspiration in the outdoors in some way. I took on that challenge with some mixed media on a double page layout about a beach trip.

Playing with product I haven’t played with in many years, namely modeling paste, did help get my brain going a bit. Plus I combined the product with a new technique I just saw on a demo video. So combining those two gave me a new way to play. Not everything was successful, but it did feel good to experiment.

If you want to see the whole process, you can check out my YouTube episode. Until next time, I hope you find artful ways to be happy!

Ten Ways with Washi Tape

Do you ever pull out a product and just play with it to see what your imagination could do with it? Well this year I’m on a quest to do just that. Once a month I pull out an inexpensive crafty product and play to find as many ways to use it as I can think of. This month I’m playing with washi tape. While this post is titled 10 ways to use washi, I have more than that to show off.

Here is the video showing it off. If you prefer the text and photo method, read on…

Here is a visual guide to the ways I use the tape in the video. Now some of these tips are best seen live (like creating hinges and pockets) but if you get the gist, then you can go play with your tape! This photo is not in the same order as the video, just an overview of all the techniques.

Spruce up journal cards with washi tape
  1. Create hinges and tabs
  2. Create pockets
  3. Use it for matting photos
  4. Create photo corners
  5. Make stripes and plaids
  6. Do a plaid weave
  7. Ruffle the tape for lots of texture
  8. Create monograms
  9. Makes rows of various tapes tightly packed together and then punch shapes
  10. Fussy cut to create stickers
  11. Use thin tapes as journaling lines
  12. Create pennant banners

Mixed Media Frenzy Hop

Hi All. On Christmas day I was a part of the Mixed Media Facebook group’s crafty hop. The theme was Merry & Bright and I took that theme very literally, using those words for my title and watercoloring up a storm. You can check out my leg of the hop on YouTube. And while most of the crafters were also on YouTube, there were a couple of Instagram posts. All the things to all the participants are listed below. I hope you check out everyone on the hop.

** https://www.youtube.com/channel/UCTFGITeK2K1-JyYpExZi-Og
** https://www.youtube.com/channel/UCovgS5VWlJvUXoMkkpbnGtA
** https://www.youtube.com/channel/UC4L_pFpVXIcYGxo3wXOsvWA
** Instagram.com/calibeachgirl64
** https://www.youtube.com/channel/UCrKcHSDpP60el15QyNUILUA
** https://www.instagram.com/sbarrackman/
** https://www.youtube.com/c/Cityscrapper
** https://youtube.com/channel/UC8qCG2earNc7pIZQNo-V1Pw
** https://www.youtube.com/user/shanedblinn
** Floppy Eared Farm- https://youtube.com/c/FloppyEaredFarm

Family Friendly Holiday Crafts

I have been very busy this December creating videos of craft projects for families to enjoy together. This year we all highly need some distraction from missing our normal routines! I created a play list of all the crafts from this moth, as well as a couple videos previously made that fit the bill. I hope you find something enjoyable to create with your families! Happy Holidays to you all, no matter what events you celebrate this time of year.

One technique, two crafts

Today I’m taking a tried and true technique and turning it into two different Christmas craft projects. And it you have kids, they can certainly play along.

I have an svg freebie for you of that Christmas tree available in this file download. Bundled together you will get the svg as well as a pdf copy of the instructions for the greeting card. (For the svg along click here.) If you make these projects and post them to Instagram, please tag me @craftysouppics and use the hashtag #craftysoupsharing and we can start seeing each other’s work!