Join me all month of advent as I open each day of the Spellbinders Crafty Advent Calendar. Some days I will create a project and some days I’ll just show off the goodies. No matter what, I know I will use each and every product at least once this month. So much fun awaits!
If you missed previous days, be sure to go back and see the first seven days as well as days 8-14. If after seeing all the goodness you’d like to grab one of these calendars, they are on discount right now (as of 12/11/24) over at ACherryOnTop.com**. For now, let’s dive into the next section of fun.
Day 15: Embossing Folder
Day 16: Sentiment Die Set
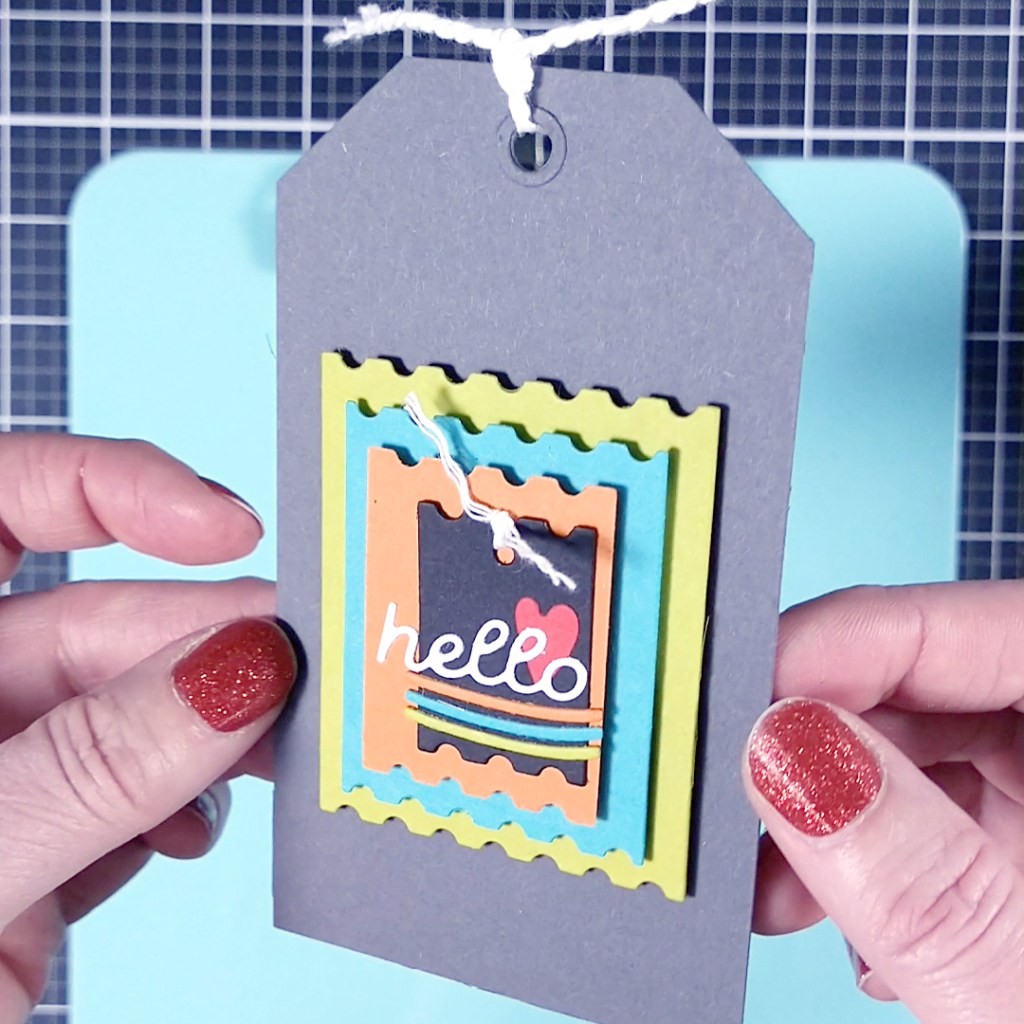
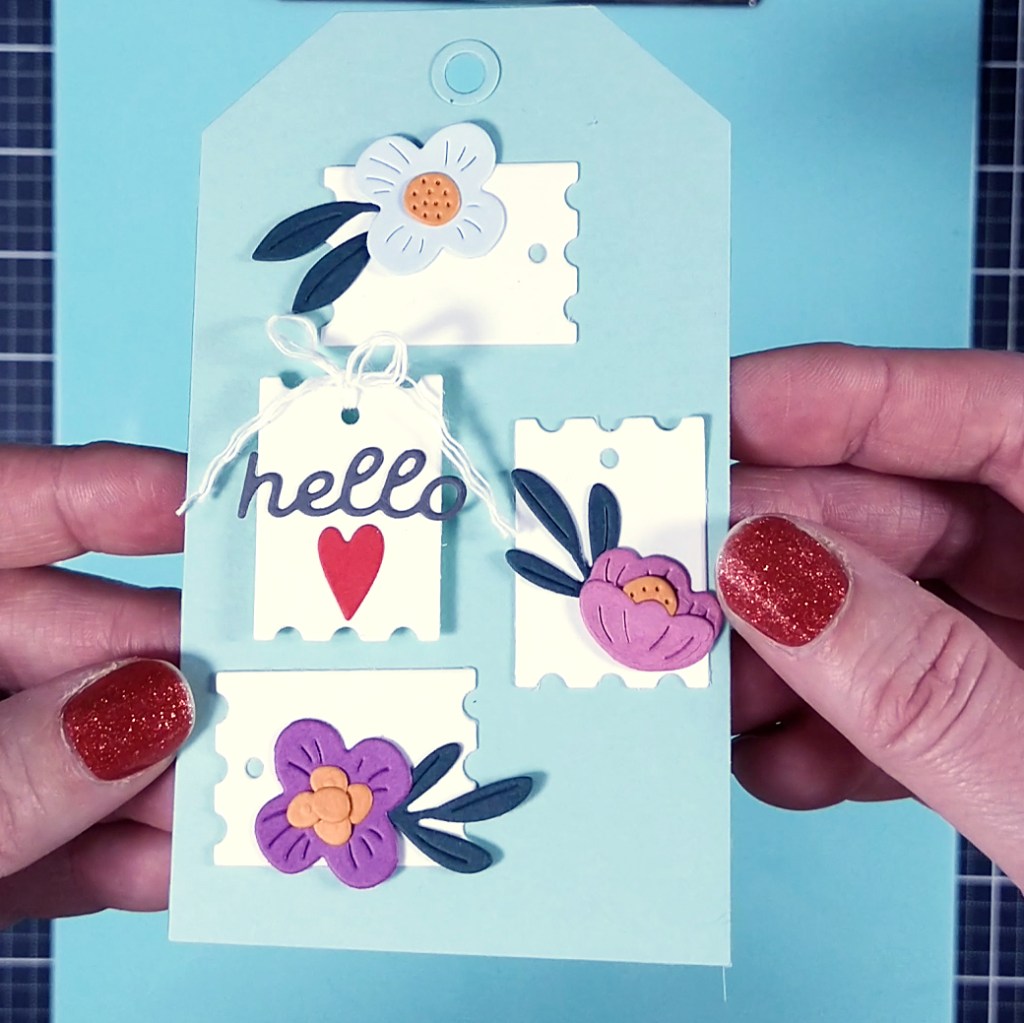
Day 17: Nested ticket/postage edged die set
I had way too much fun with this nested set. I was supposed to keep the day’s project simple. But. Nope. I had to make all the things.
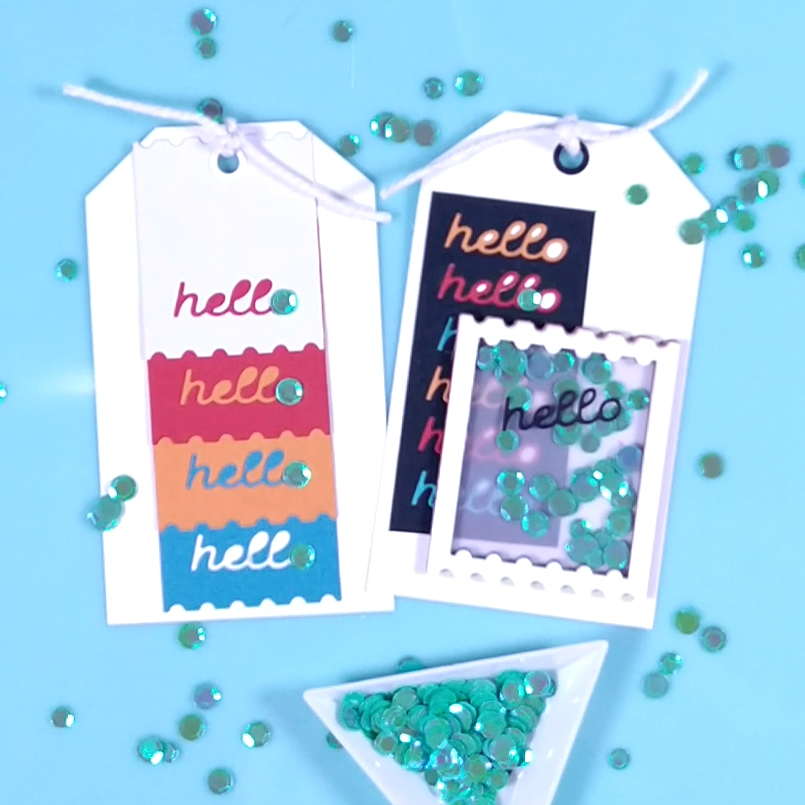
Day 18: Sequins
You know I had to do it at some point. Today I made a shaker! And a bonus card too for other sequin ideas.
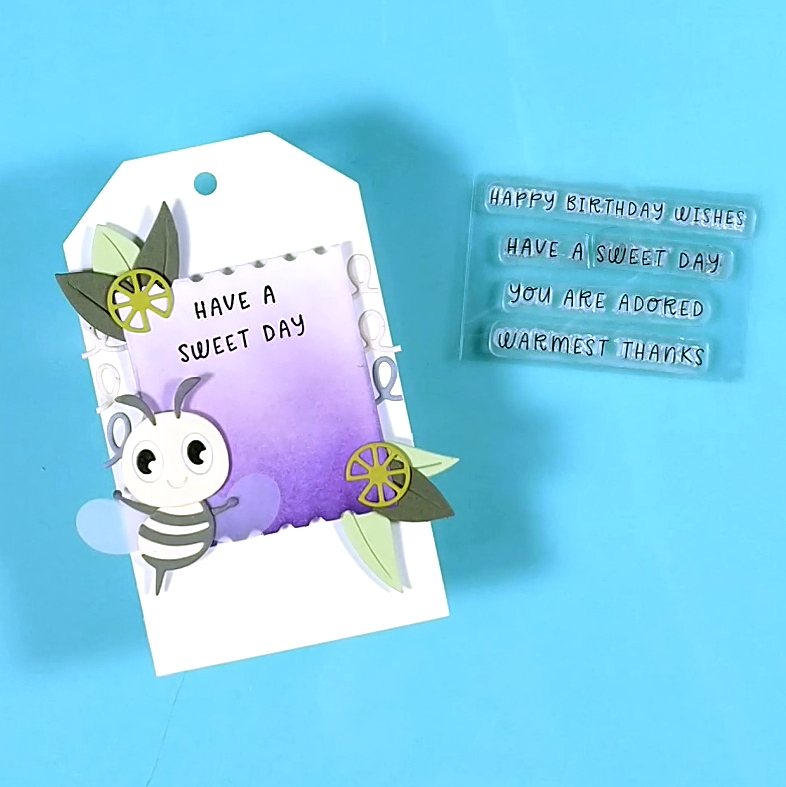
Day 19: Sentiment Stamp Set
I was rushed for time today. So my exposure is bad on my filming (and still image capture!) But I did make really good use of many leftover bits that I have been saving throughout the series. I cut a new tag and did some ink blending. Besides that and the stamping, everything else was done.
Day 20: Random Dots Stencil
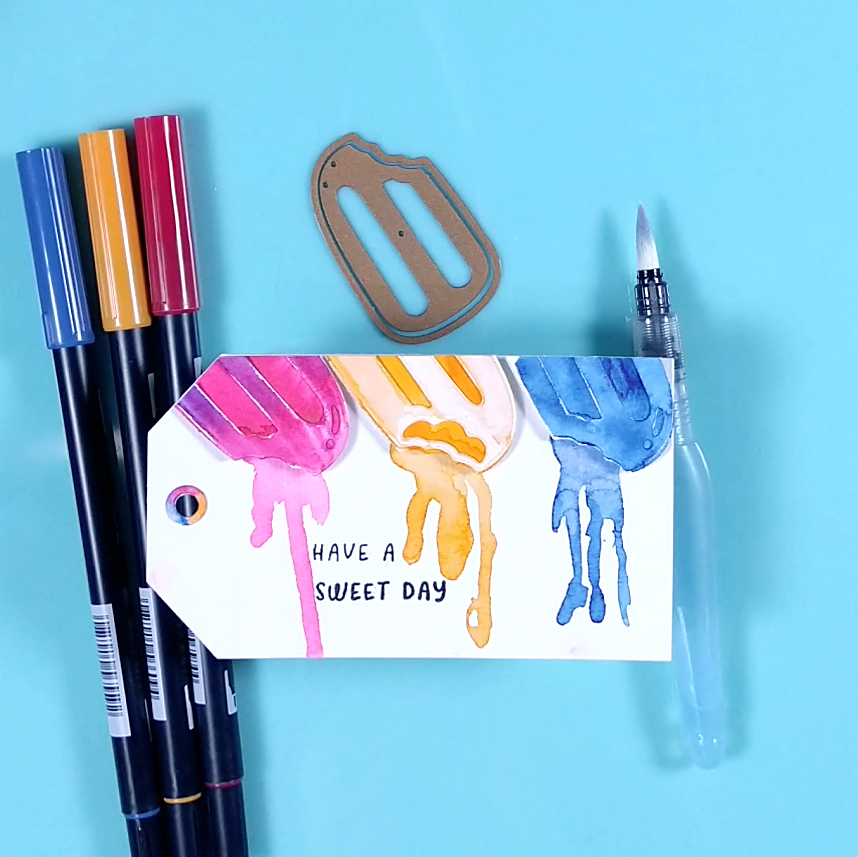
Day 21: Popsicle
I admit that some of the included pieces kind of puzzled me. In fact, they felt like a puzzle as I was trying to layer them all together. I think in the end there are options, LOL.
** I use affiliate links when possible. When you shop using my links I earn a very small commission at no cost to you. I appreciate your support of my work in this small way!
Join me all month of advent as I open each day of the Spellbinders Crafty Advent. Some days I will create a project and some days I’ll just show off the goodies. No matter what, I know I will use each and every product at least once this month. So much fun awaits!
Here I will collect each week of the project and post pictures and videos to share the fun and inspiration. If after seeing all the goodness you’d like to grab one of these calendars, they are on discount right now (as of 12/11/24) over at ACherryOnTop.com**.
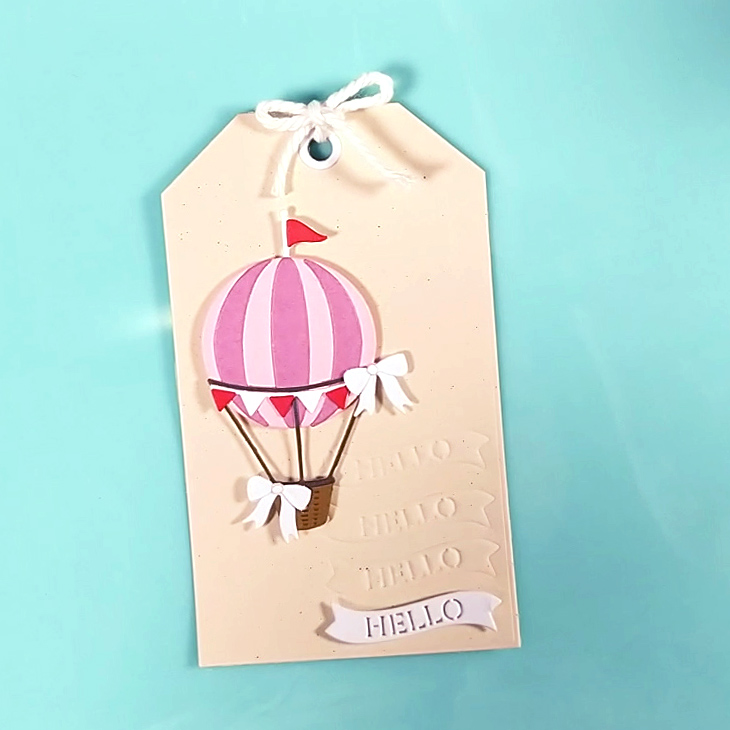
Day 1: A Hot Air Balloon
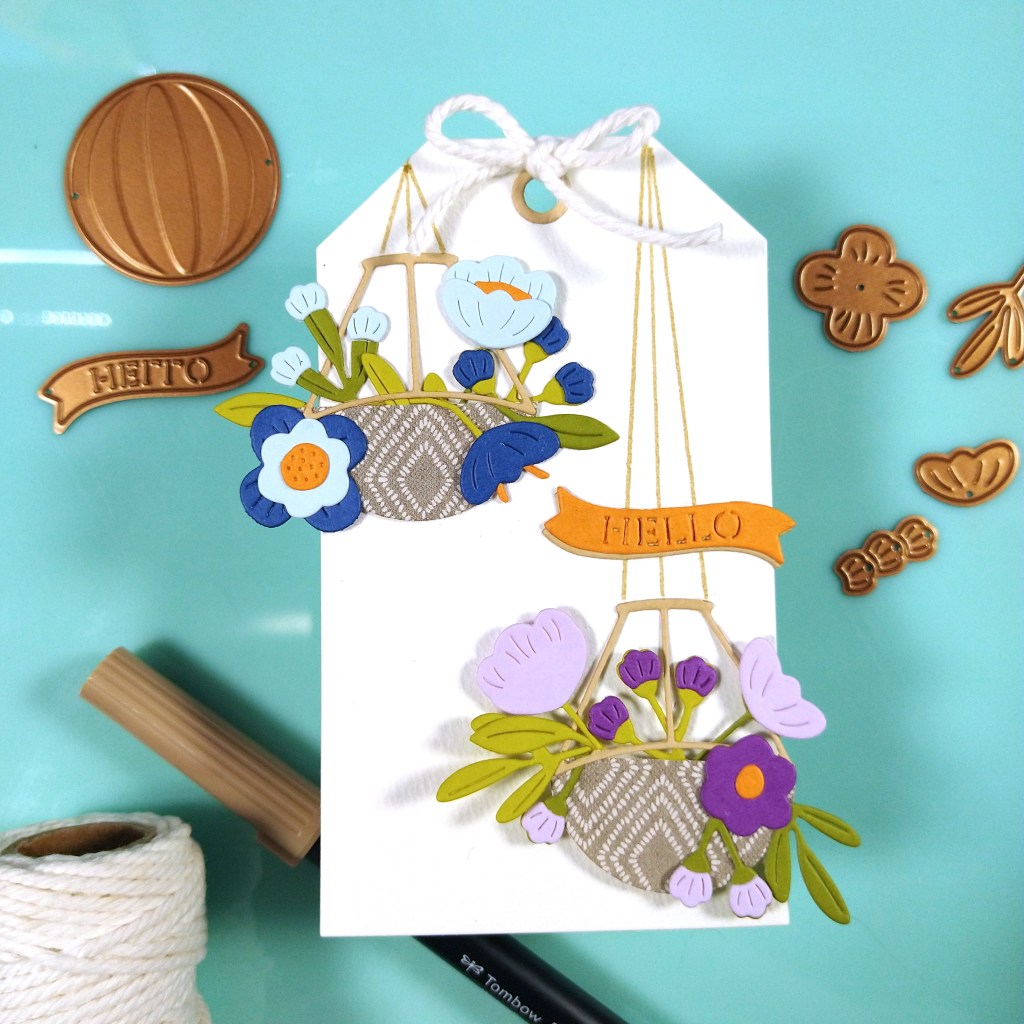
Day 2: Floral Stamp
Day 3: Flower Set
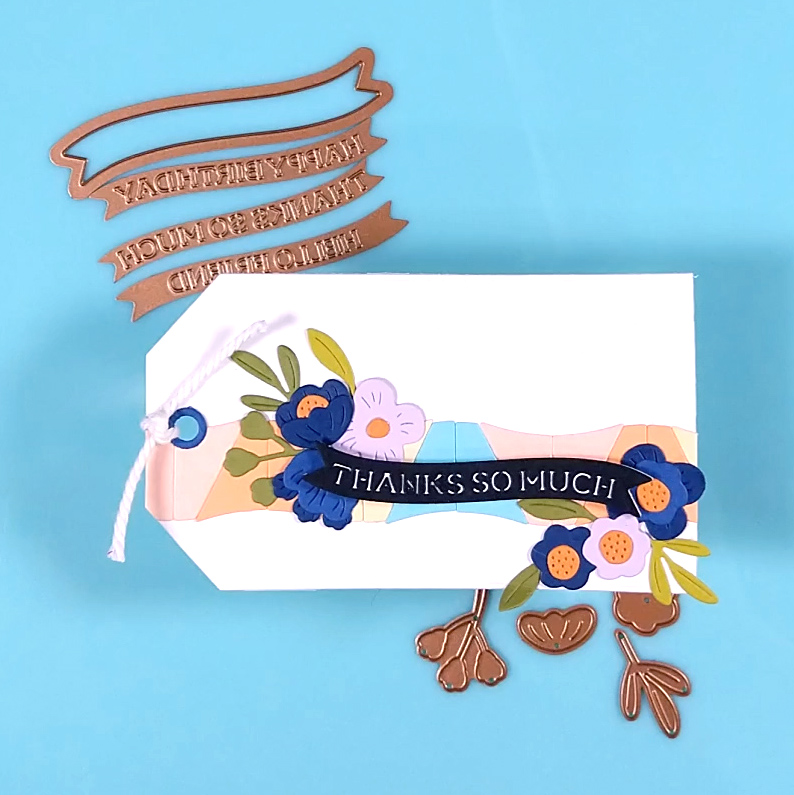
Day 4: Sentiment Banners
Day 5: Doodled Borders
I’ll admit I’m not sure how much use this little squiggle die set. But I had fun with it today and that is what matters right now. 😊
Day 6: Honey Bee
If you’ve followed me for a while, you probably know that cutesy is not my style. I’m super excited about this bee. I’m sure plenty of people are though! At any rate I made use of the bee but he’ll likely sit unused after this. That is okay. I’m still loving my Advent Calendar!
Day 7: Floral Stencil
No time for a project today. But I got a quick video in and gave info on what I’m doing with all these tags that I am making during this series. Stay tuned for that blog post coming very soon.
By day 10 I was able to finally do a makeup project for day 7. I actually made something Christmas themed!
** I use affiliate links when possible. When you shop using my links I earn a very small commission at no cost to you. I appreciate your support of my work in this small way!
I love kit building and that is why I am on the design team for the Counterfeit Kit Challenge project. We take an inspiration kit each month and proceed to replicate it, or as we say, counterfeit it. This is a free, friendly group that helps inspire you to use up supplies you already own. We are not about needing to buy the latest and greatest thing (though we won’t stop you if you enjoy new crafty goodies😉 ).
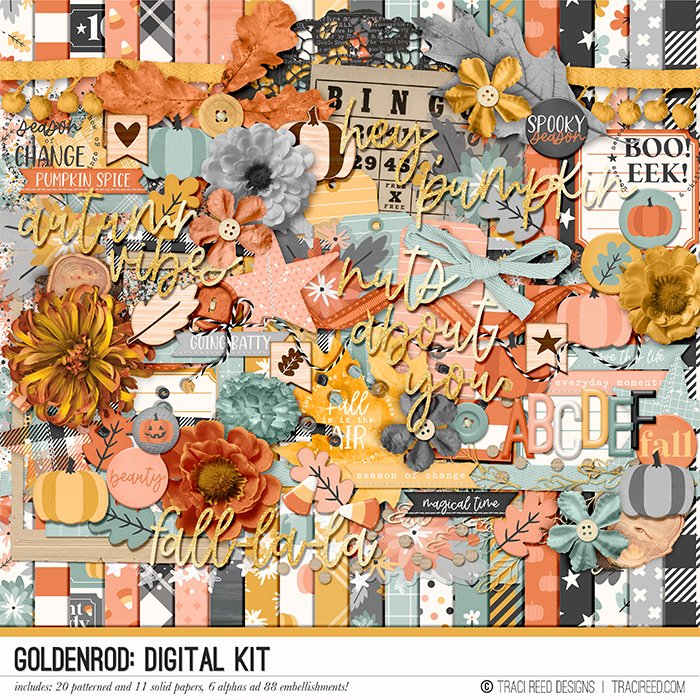
Welcome to a new month of kit building. Vikki is our hostess this time. She chose the Goldenrod Digital & Printable Kit by Traci Reed Designs to inspire us. Before we dive into the details of this kit, let’s give a warm welcome to our guest designer this month. Tamra Hunt, pictured to the left! You can find her on her blog.
So let’s move on with our kit. Here are a few looks at what we have in store this time around.
Lets take a bigger look at the papers since that is where I usually start. What caught my attention was the fact that there were plenty of everyday papers tucked in there. From plaids to polkadots, I found plenty to inspire me outside of the definite fall theme of this collection. I very much appreciate that! I also liked that the softer than traditional color palette as well as the addition of gray and gray-teals.
So these are the papers I came up with. I subbed out the black star print for a large bold multicolor star. I included one leafy print and one pumpkin print as a nod to the theme. I also subbed in one wreath print that while intended for Christmas, could work really well on a Halloween layout with porch pumpkins!
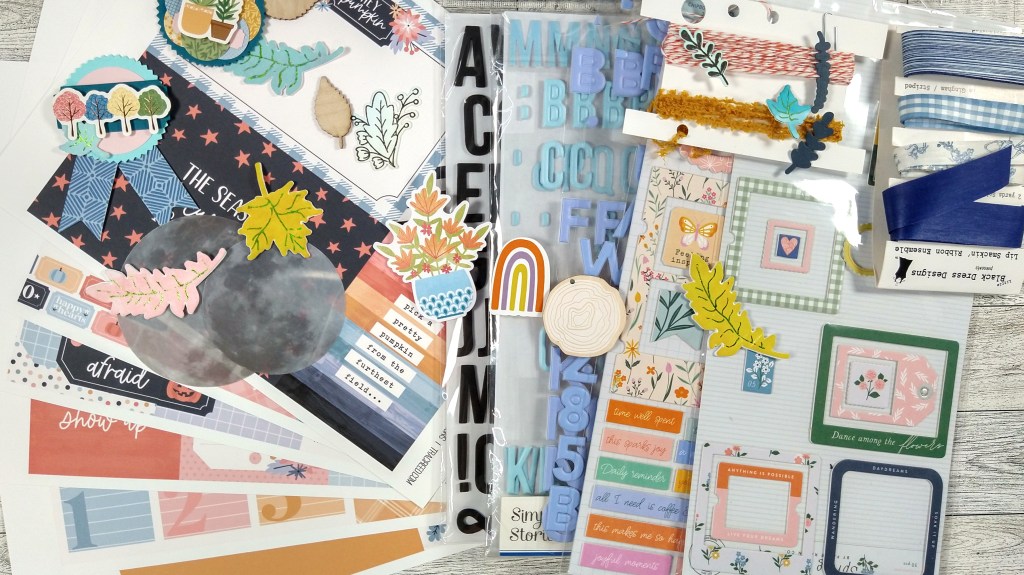
And here is a look at the embellishments. I kept my main selection of embellishments manageable. I will allow myself to draw readily from my stash of fall and Halloween embellishments as needed.
Don’t forget that each month I also create my own elements to add into my kit. Of course these are inspired by the original kit, but often have a twist of their own. So don’t miss what I will make in just a couple of days. I’m sharing some things from super-easy to fun-techniquey this time around.
There is a tradition over at CKC of titling our kits just like companies do. So in honor of the wreath print I included, I’m calling mine…
Porch Decor
If you want more details on my kit building thought process, check out my kit build video.
I hope you can follow along with the other designers and see how they interpreted their own kits.
Have fun kit building and don’t forget to show off your stuff over on the CKC Facebook group, or tag us on Instagram @counterfeitkitchallenge or use #counterfeitkitchallenge.
I’ll be back on the 4th, for our Product Forgeries. Until then, have an artful day!
I’ve been jamming in a bunch of design team work after spending 4 fun-filled days at the Crop & Create Delivered Card making “retreat”. It is an online event if you aren’t familiar with C&C. But it is jam packed. I buy special meals, snacks and treats, clean my room and prep for a week in advance. So to me this IS a retreat. It just means I don’t have to pay for hotels or flights. 😉
At any rate, that means my other crafty life had to play catch up. On the design team at CKC we create our own products each month and offer mini kit inspiration. I was tasked with both jobs this month and combined them up nicely.
The Makes
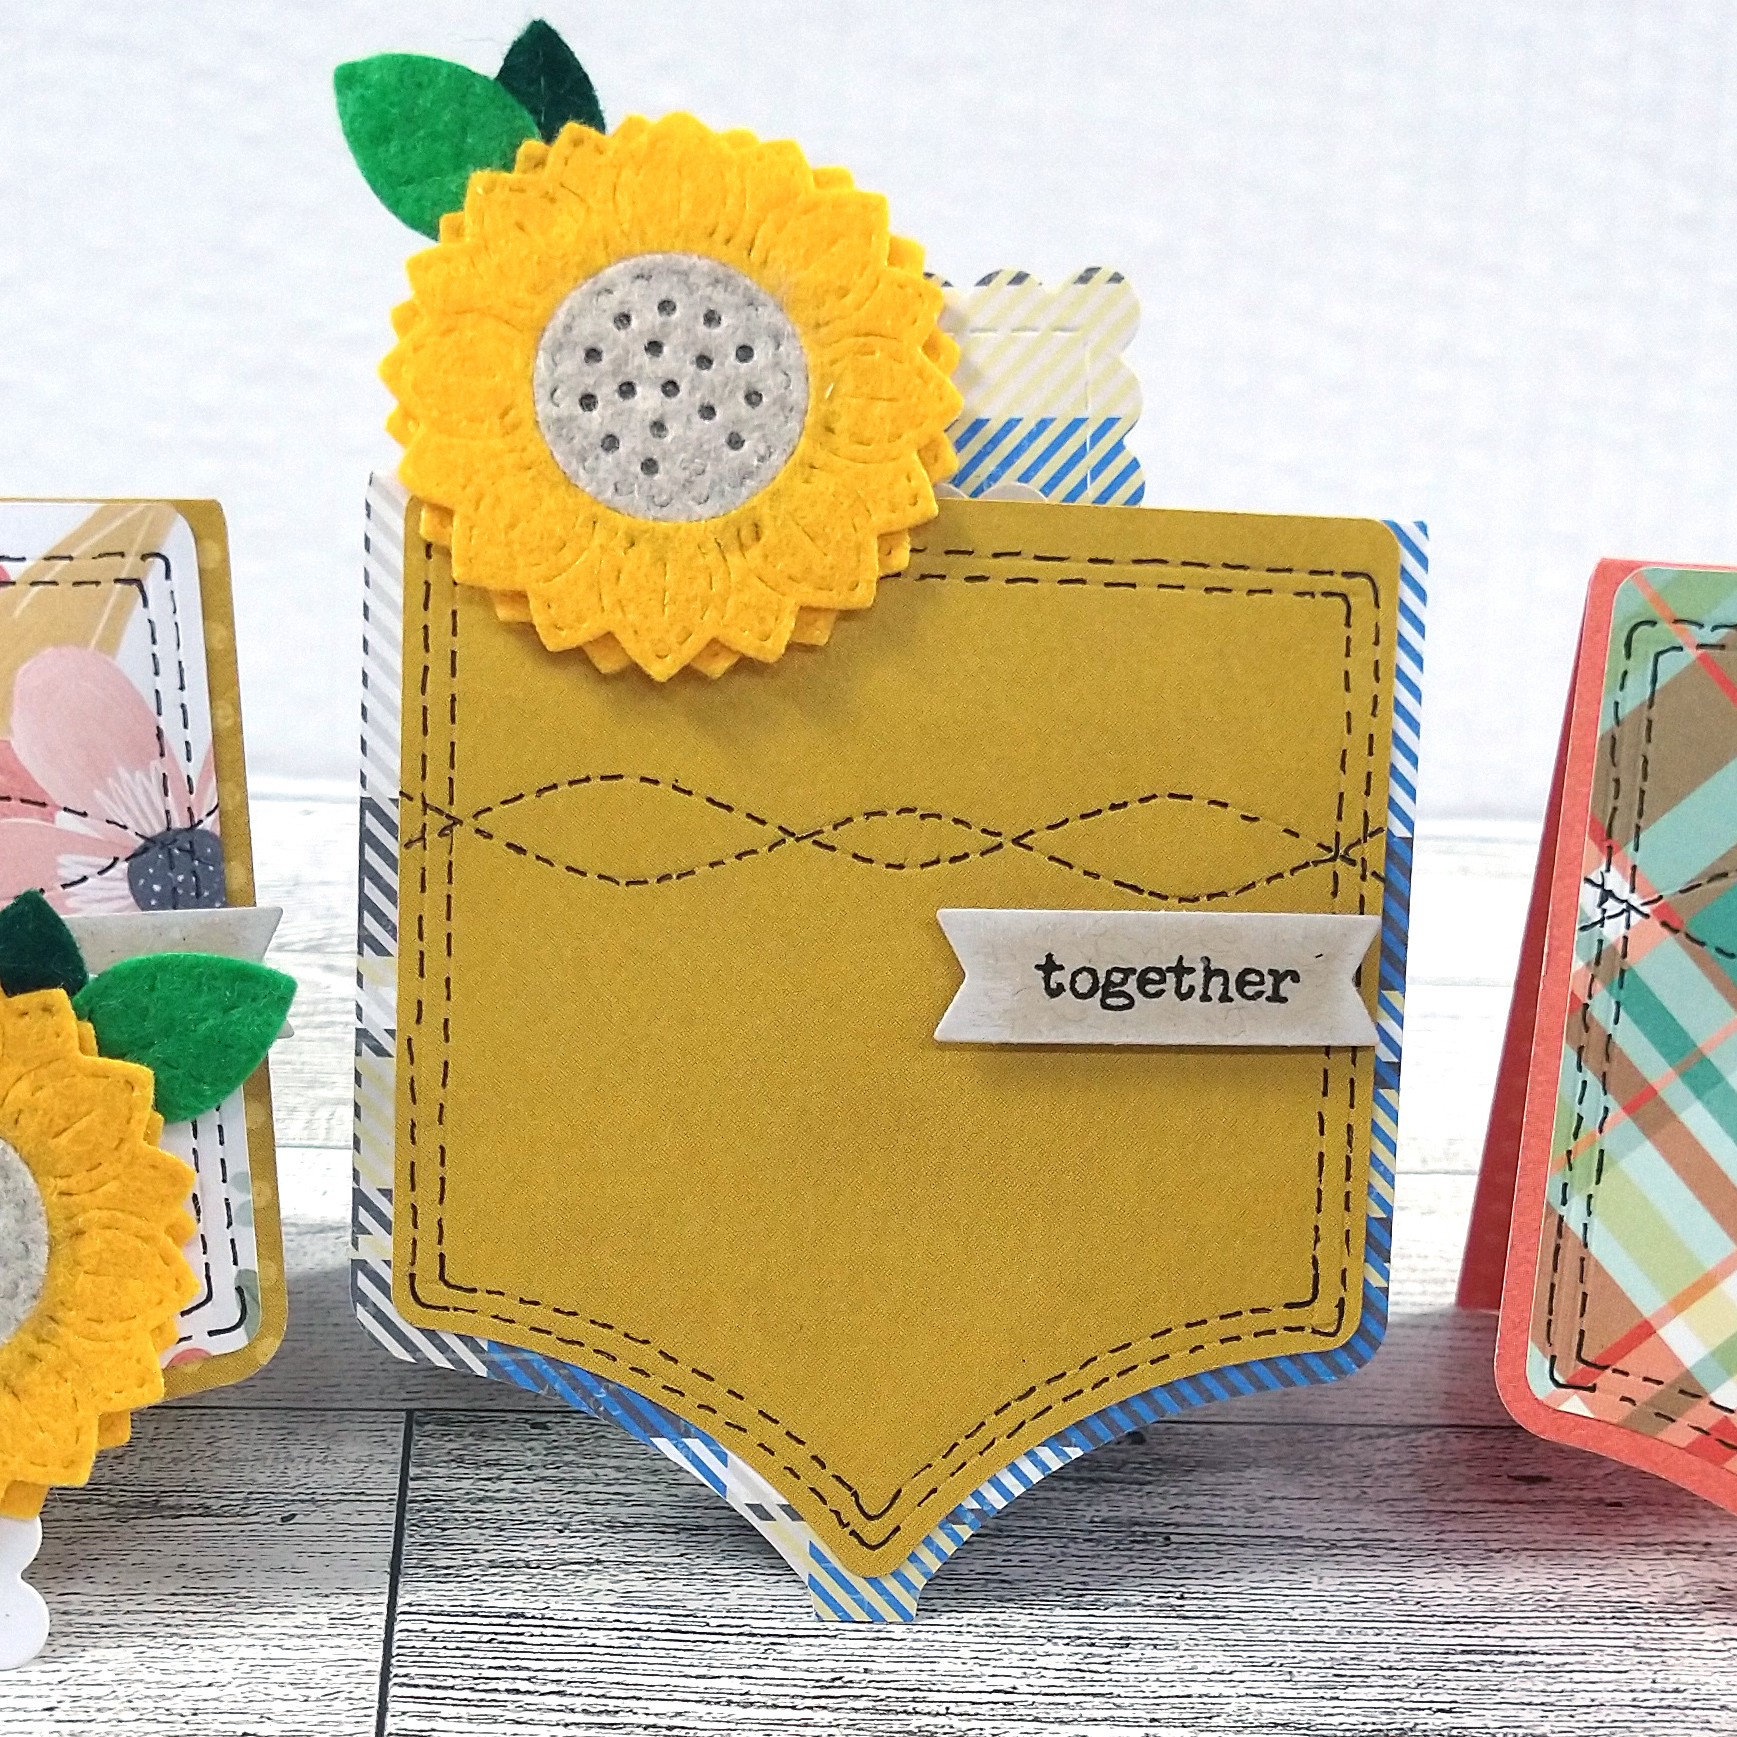
Fist here are my makes for October. Fabric flowers created two ways. Denim was upcycled to create the flowers on the left in pleated style and rolled style. On the right, felt was die cut to create sunflowers.
If you want to see more of that in action, plus a peek at one of my fails, then check out this video.
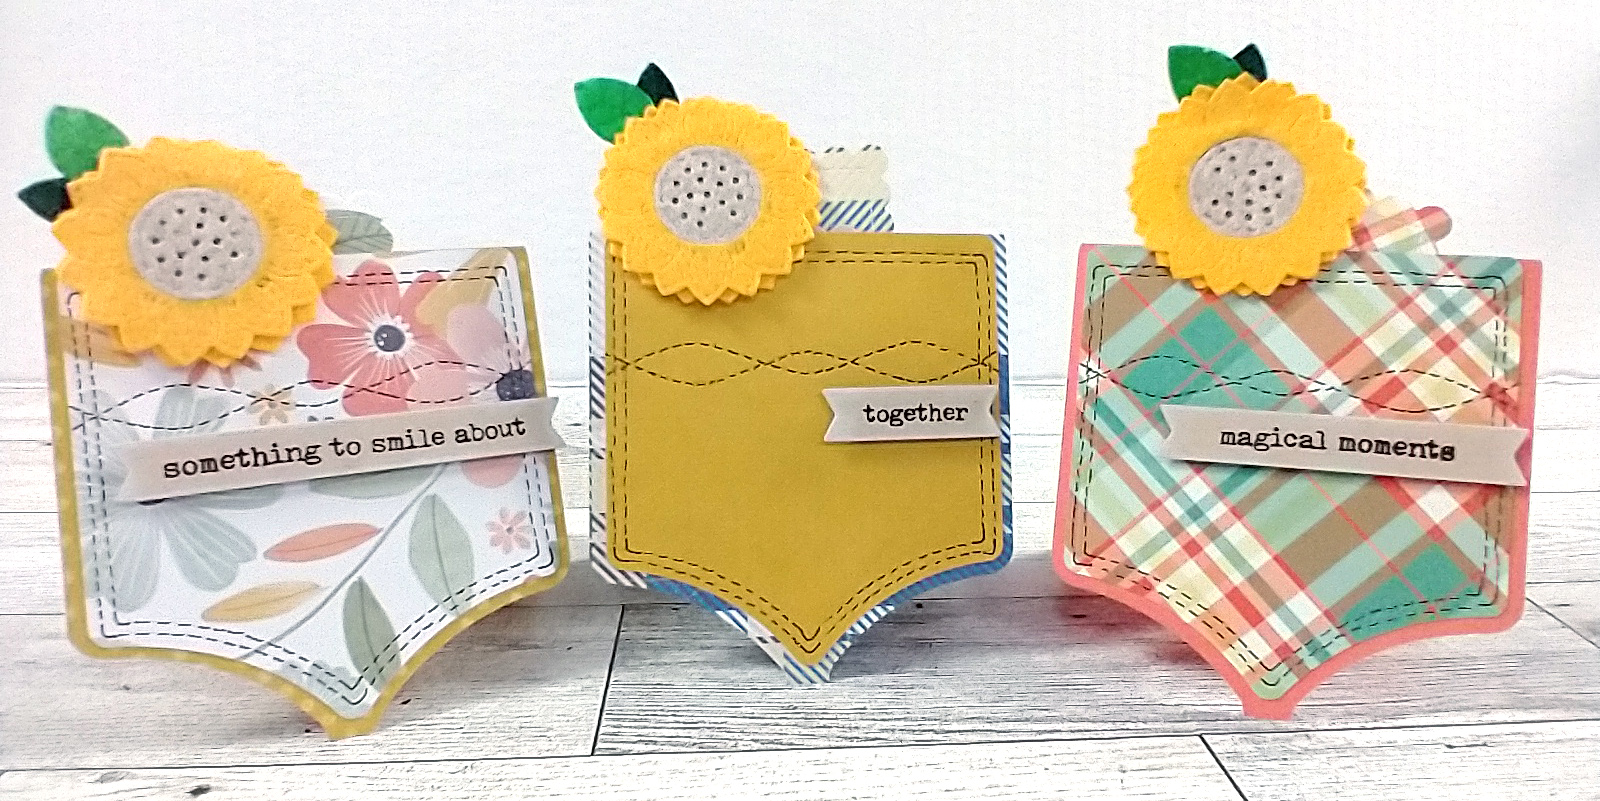
The Mini Kit
A couple of days later I put those sunflowers to use in my mini kit. I took some of the supplies that did not make it into my main kit for the month and included them in this mini kit. I knew what I wanted to make and since I didn’t own the products to make it happen, I designed some myself. In fact I’ve already release that brand new, FREE cut file for all of you to download. It is featured in this blog post.
With my kit and cut file ready I set to work. I created these fun table decor items. But don’t limit yourself to just table decor. These would make great notecards to sent as well.
I do share some tips and tricks in the video where I created these. Check it out.
I hope you enjoyed this bit of early Thanksgiving crafting. Until next time, have an artful day.
It has been a few months since my last freebie release. I was super excited when I got this idea and had to create it right away. I created a small notecard with a pocket design. There is a top layer that you can glue on to create and actual pocket. This is great for making table decor as place settings or name tags.
I have many ideas to go with this pocket and look forward to creating more of these sweet projects. I’m hoping to work with this cutfile more in the future! Until then, if you want to see how I created this table decor project you can check out that process video.
Now if you want to see how to use these cutfiles in Cricut or Silhouette, please check this out. These tutorials assume you know basic features and functions of your software and gives you specific tips on using and adjust the various layers of this cutfile to produce a final cut.
I love kit building and that is why I am on the design team for the Counterfeit Kit Challenge project. We take an inspiration kit each month and proceed to replicate it, or as we say, counterfeit it. This is a free, friendly group that helps inspire you to use up supplies you already own. We are not about needing to buy the latest and greatest thing (though we won’t stop you if you enjoy new crafty goodies😉 ).
Man, I have been so busy with a long list of stuff going on. Luckily most of it is good. Unfortunately it means multiple things have fallen through the cracks. Deep breath. Pick up the trail and move forward.
With that I am here with my October kit. The team at CKC breaks up tasks for the group by various jobs. I’m actually on the job of creating a mini kit + project this month. But… that kit & project is going to be a fun home decor idea (sneaky peek there). That means I still need a scrappy kit. So here it goes.
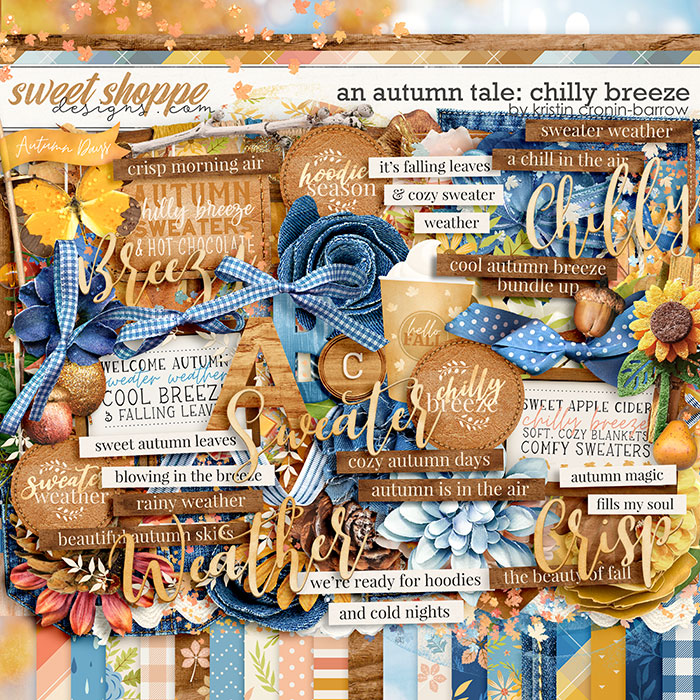
First here is our guest designer: Liz Ketter! You can find her on Instagram. I don’t know Liz so I am looking forward to seeing her work. Speaking of which we need to build a kit based on inspiration. Since I am behind the times, you can check out Liz’s and the rest of the team’s kits over at the CKC Blog. We are working with the An Autumn Tale: Chilly Breeze digial kit available at Sweet Shoppe Designs.
The very first thing I noticed was the demin accent. LOVE. We have had at least one other month with denim vibes during my tenure on the team. Still loving it. I also appreciate the softer takes on oranges and browns. Those are not my go-to colors at all. Yet the tones here have a bit of a glow to them that I appreciate.
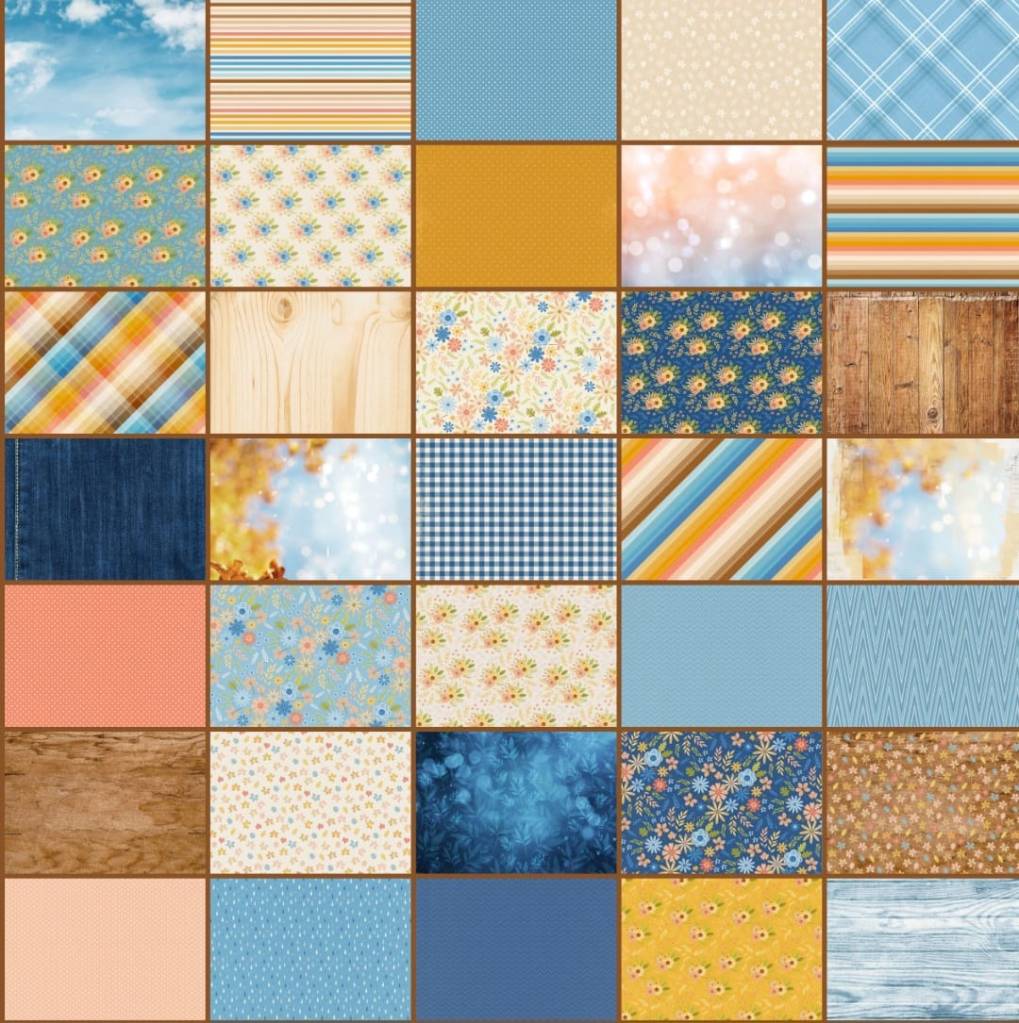
So these are the papers I came up with. Apologies for the blurry photo. I had my camer in the wrong setting when I snapped this and didn’t realize it until it was too late.
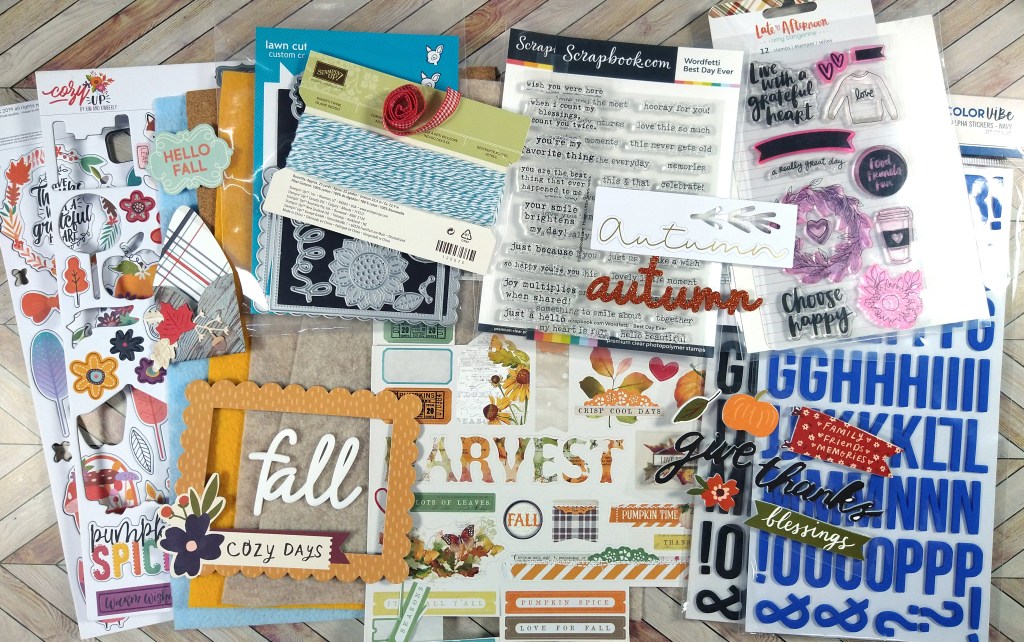
And here is a look at the embellishments. Despite the chaotic look of this pile, I kept it simple. I added dies and stamps to create items as I scrap. I added textural elements of felt and cork. Then I just plopped my entire fall embellishment pouch onto my kit. Done.
Don’t forget that each month I also create my own elements to add into my kit. Of course these are inspired by the original kit, but often have a twist of their own. So don’t miss what I will make in just a couple of days. I’m loving my ideas this time.
There is a tradition over at CKC of titling our kits just like companies do. So I’m calling mine…
Easy Breezy Autumn
If you want more details on my kit building thought process, check out my kit build video.
I hope you can follow along with the other designers and see how they interpreted their own kits.
Have fun kit building and don’t forget to show off your stuff over on the CKC Facebook group, or tag us on Instagram @counterfeitkitchallenge or use #counterfeitkitchallenge.
I’ll be back on the 4th, for our Product Forgeries. Until then, have an artful day!
As a design team member over at the Counterfeit Kit Challenge group I play along with as many of our monthly inspiration challenges as I can. The Forgery on the Fourth project is definitely one I enjoy! That is where we see a scrap product we like and set out to recreate it with supplies we already own. So let’s go ahead and dive in to what I have for you this month.
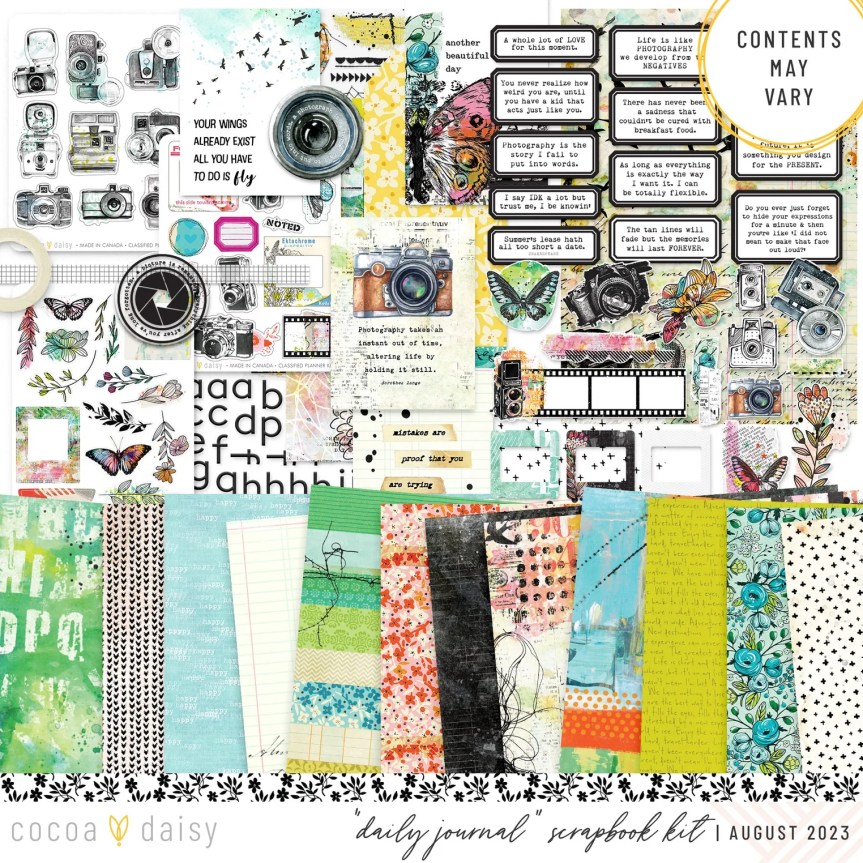
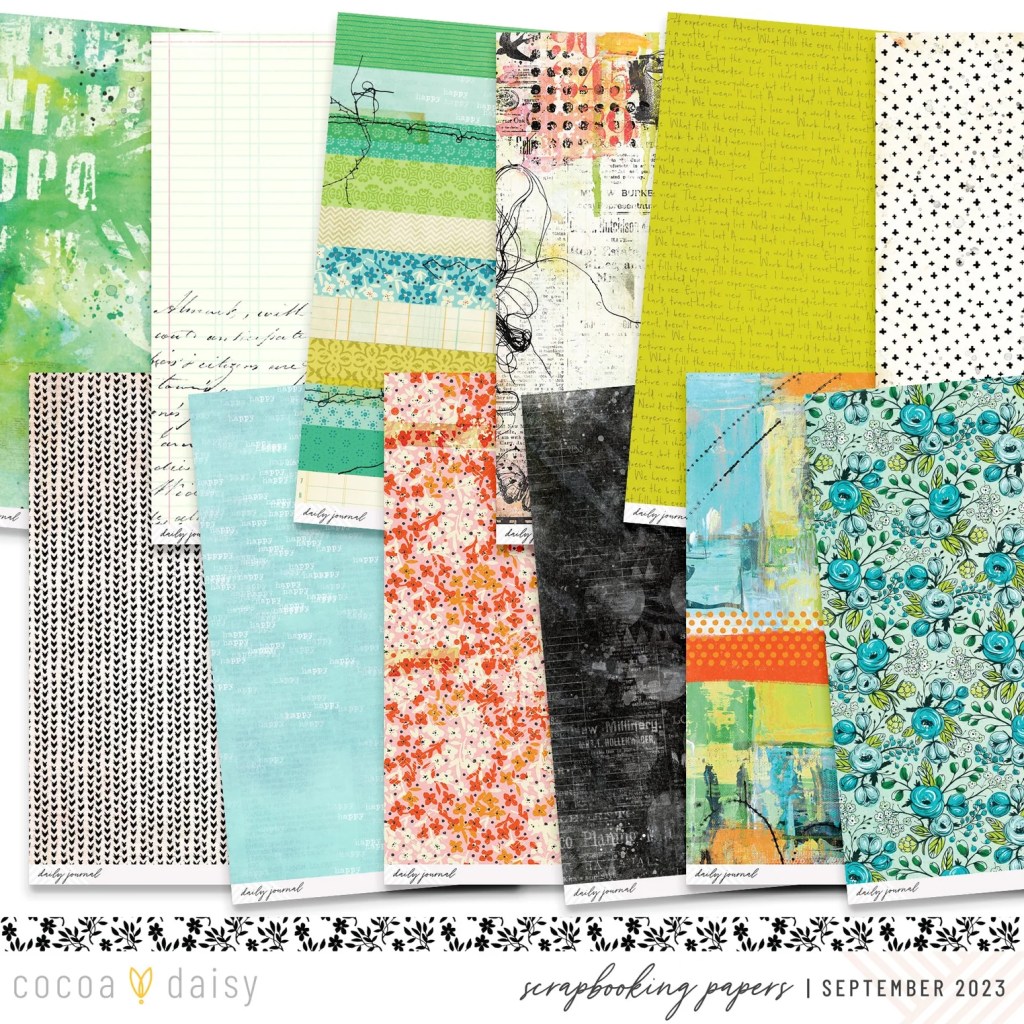
Since we always start our forgery projects with inspiration, here is the image we are working with this month. It is the Daily Journal Scrapbook kit from Cocoa Daisy.
I was drawn to the pattern papers right away.
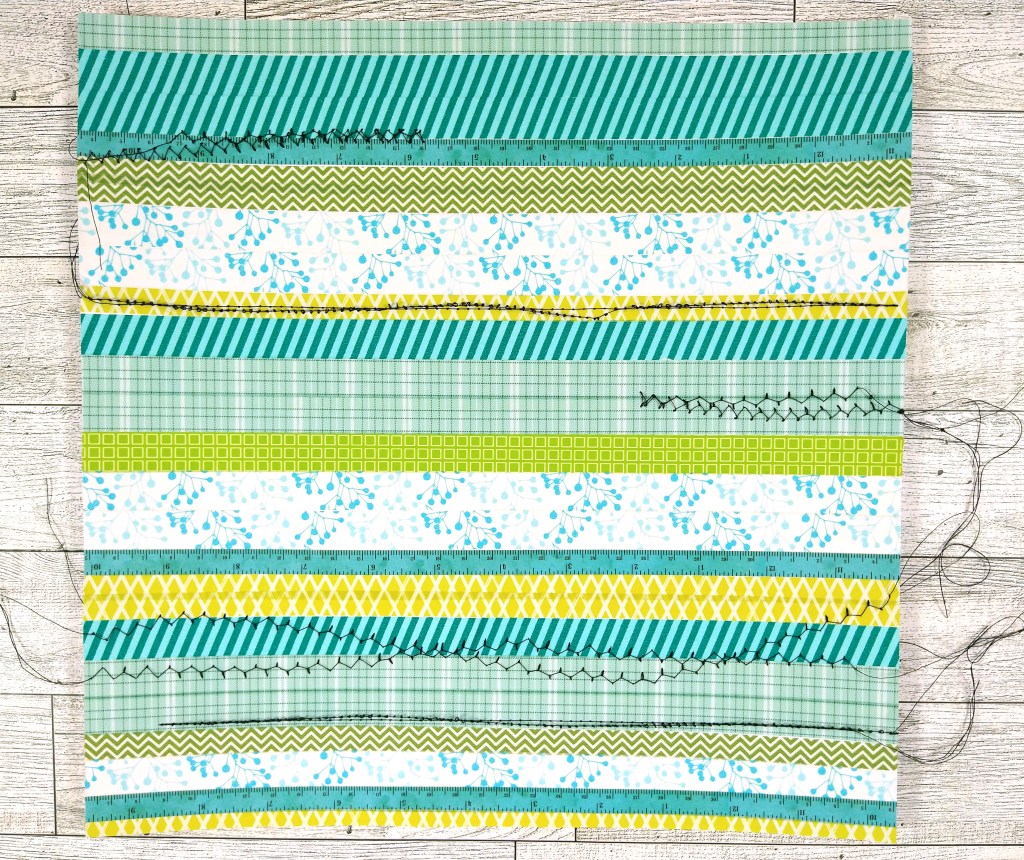
In the top row, the third from the left is that striped pattern paper. I was instantly drawn to that and knew that I wanted to recreate it from washi tape. That part went as expected. When I took that paper to my sewing machine a happy accident occurred. The tension on my machine was too loose and my stitching ended up being loosey goosey. There is no other way to describe it, LOL. I loved the texture for sure and will make this a purposeful technique in the future.
Can we just take a moment to reflect on why forgeries are so fun? I took the inspiration of a flat piece of patterned paper and recreated it with physical products. The real life texture this brings is awesome. I feel like I made it better than the original.
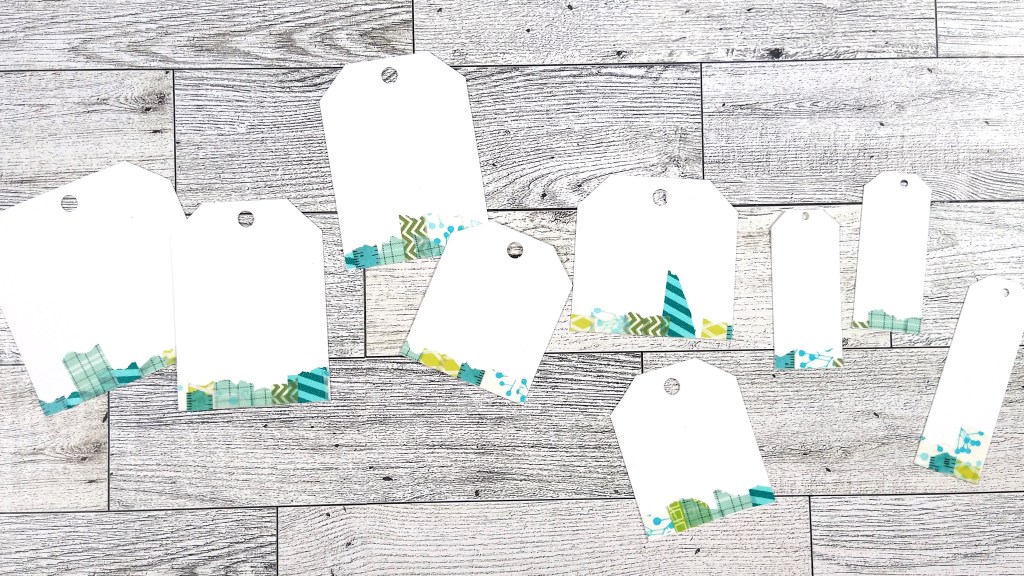
I created a bonus set of embellishments from this project. I saved all the little tails that I cut off of the washi tape when I trimmed the straight paper edges down. Those I applied to the edges of scrap paper. I cut that paper down and formed tags!
I wasn’t done yet. My next forgery was to make that far left pattern paper in the bottom row. Zooming in on that it is a slightly distress chevron print. I wanted to try a couple of things and ended up making a double sided piece of paper with a technique on each side.
The left was straightforward stenciling. However I used a Paper Pouncer^^ from Picket Fence Studios to make the job super fast! On the reverse side I used a chevron embossing folder as a stamp! There were a couple of challenges with this technique so I ended up with more distressing than intended. While this wasn’t quite what I wanted, I think the technique is worth fine tuning in the future.
If you want all the details on creating these lovely items, check out the video.
That is it from me this month. Stay tuned for when I put these to use on layouts! For now, you can find more creative ideas at the CKC blog. I hope this gave you some ideas on how you can recreate your favorite products with supplies you already have on hand. Don’t forget to show off your stuff over on the CKC Facebook group, or tag us on Instagram @counterfeitkitchallenge or use #counterfeitkitchallenge.
Until next time, have an artful day.
^^Disclosure: I do use affiliate links to products at no cost to you. I receive a small percentage of any sales from these links. I really appreciate your support by shopping through my links. It keeps my craft room stocked with supplies for future projects!
I love kit building and that is why I am on the design team for the Counterfeit Kit Challenge project. We take an inspiration kit each month and proceed to replicate it, or as we say, counterfeit it. This is a free, friendly group that helps inspire you to use up supplies you already own. We are not about needing to buy the latest and greatest thing (though we won’t stop you if you enjoy new crafty goodies😉 ).
I am not ready for summer to be over. I’ve barely been outdoors this year! Maybe after ridiculously hot summer temps I can shift my outdoor mindset into fall. Until then I will continue to scrap in my basement and avoid the overwhelming heat.
That means I need to kit build once again. This time I am taking a different tack for two reasons.
I’ve taken on the mini kit job this month over at CKC.
I need smaller kits since I have barely made a dent in the past few kits.
With that in mind I decided to build out page kits. I have done this in the past, but I have a bit of a difference this time. I’ve chosen my stories first, then built my page kits. Kinda. Sorta. I’ll explain after I introduce you to CKC’s guest designer for the month. Welcome Amy Jo Johnston. She will be sharing her work over on the CKC Facebook group. Be sure to check her out there and show her some love.
Now we can get to the paper. Brandi Jo chose our inspiration this month. As she has boys, you’ll notice a lean toward blues and greens. Yet there is a hint of florals if you need some of that in your life! Check it out.
I love the colors and the option to add some pops of boldness. The camera icons are something I’m all about, yet haven’t done in a while. It’ll be nice to pick up some old favorites again. Plus I’m always down for some mixed media vibes.
I took different elements of inspiration and tucked them into each kit. As I mention above, the idea to choose pictures/stories before product popped into my head as I was mulling things over. This is NOT how I normally kit. Taking on this change felt good this time around. That allowed me to use the inspiration yet really define the kits. I started really by pulling a few papers that played into the kit, then my photos/stories, then more paper for balance, and I wrapped it up with embellishments. This let me take on a bit more specific theme for some things.
Kit #1: School Kit
This one starts off looking quite different than the inspiration. But if you take a look, you’ll find commonalities. The elements I pulled from the inspo: text print, bird motif, “+” motif (in my case I used “x”, but you get it, right?), cameras and frames. Then I felt free to add in extra embellishments for the story. In this case a school story.
Kit #2: Memorial Kit
For this one I leaned into the pops of black. In addition I included film strips, frames, a hint of floral, washi tape (including a bird one), and a few tabs and tags. The basics from this kit (papers, stickers, journal cards) are all from Simple Storie’s “Heart” line from several years ago. I’m sad to need this line, but glad I had it on hand already.
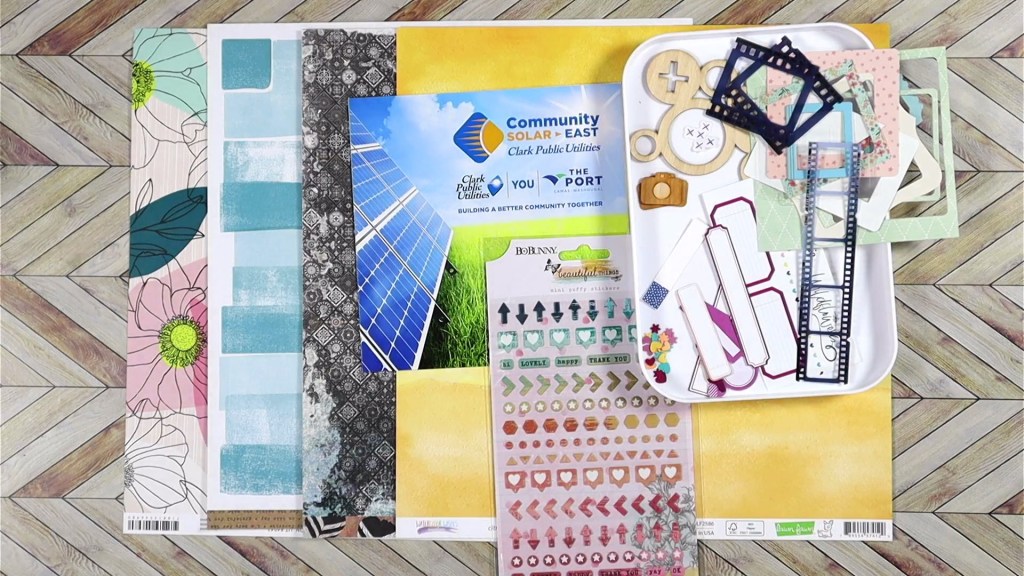
Kit #3: Solar Kit
Here again you can see some similarities and differences from the inspo. Floral in a bold way. Teals in watercolor. A shot of black. Cameras, film strips and frames.
Each kit is it’s own entity, while all were inspired from the same goods. That is one of the joys of kit building! I’ll be creating a few of my own items from this inspiration as we typically do for our Forgeries on the Fourth project. I will also have that mini kit project up on the 6th. As you can guess it is another page kit… but for a double page layout! So stay tuned for all of that.
Before we go, there is a tradition over at CKC of titling our kits just like companies do. So I’m calling mine…
Memorable Moments
If you want more details on my kit building thought process, check out my kit build video.
I hope you can follow along with the other designers and see how they interpreted their own kits.
Have fun kit building and don’t forget to show off your stuff over on the CKC Facebook group, or tag us on Instagram @counterfeitkitchallenge or use #counterfeitkitchallenge.
I’ll be back on the 4th, for our Product Forgeries. Until then, have an artful day!
As a design team member over at the Counterfeit Kit Challenge group I play along with as many of our monthly inspiration challenges as I can. The Forgery on the Fourth project is definitely one I enjoy! That is where we see a scrap product we like and set out to recreate it with supplies we already own. So let’s go ahead and dive in to what I have for you this month.
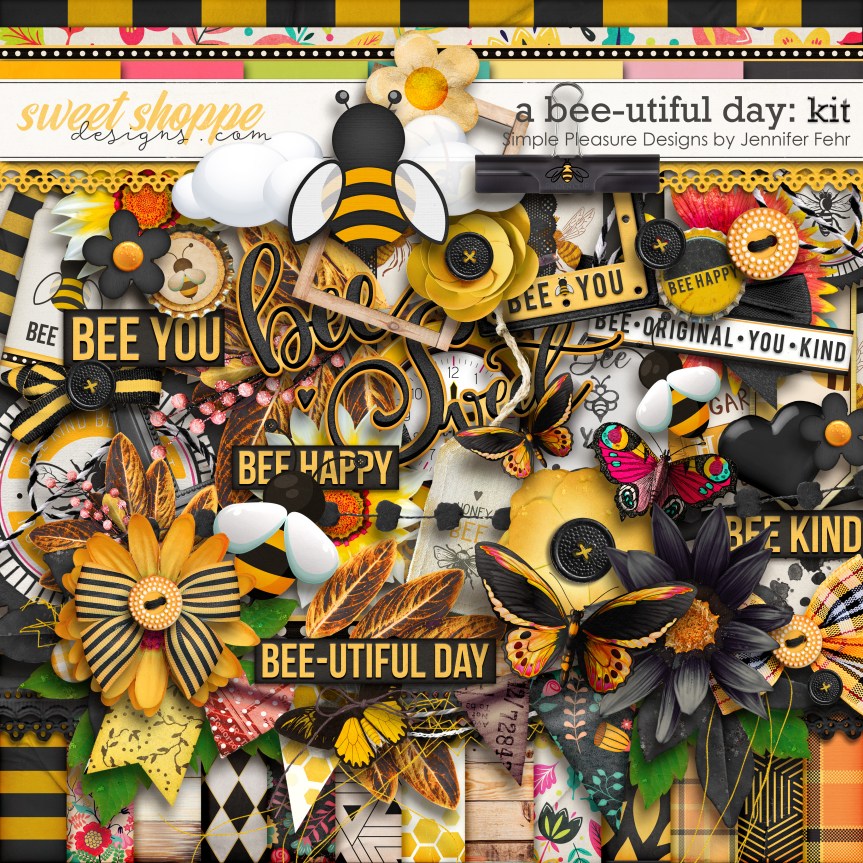
Since we always start our forgery projects with inspiration, here is the image we are working with this month. It is the A Bee-utiful Day kit from Sweet Shoppe Designs.
A bee-utiful Day kit from Sweet Shoppe Designs.
There were a couple of things that caught my attention. First we have to look at the closeup of the pattern papers to get started.
A bee-utiful Day kit from Sweet Shoppe Designs.
See that bottom right corner? It is a striped hexagon yellow print on a black base. How can you get good color on top of black? My best product for that is distress oxide inks. The inks do dry a bit duller and chalkier that than bright bold color, but that’s okay. Still a fun technique.
Next up was tackling some butterflies with a balance of black and bright colors.
A bee-utiful Day kit from Sweet Shoppe Designs.
I used mica filled watercolor paints to get that great color on top of black.
If you want all the details on creating these lovely items, check out the video.
That is it from me this month. Stay tuned for when I put these to use on layouts! For now, you can find more creative ideas at the CKC blog. I hope this gave you some ideas on how you can recreate your favorite products with supplies you already have on hand. Don’t forget to show off your stuff over on the CKC Facebook group, or tag us on Instagram @counterfeitkitchallenge or use #counterfeitkitchallenge.
I love kit building and that is why I am on the design team for the Counterfeit Kit Challenge project. We take an inspiration kit each month and proceed to replicate it, or as we say, counterfeit it. This is a free, friendly group that helps inspire you to use up supplies you already own. We are not about needing to buy the latest and greatest thing (though we won’t stop you if you enjoy new crafty goodies😉 ).
I’m trying to hold on to the last month of summer. It has been passing quickly for sure. Luckily our inspiration kit captures some summer vibes to keep us going. Before we dive in to that inspo, let’s welcome the CKC guest designer for the month. Sarah Rouault is a UK scrapper who enjoys defined kits for her projects. CKC works great for that. To learn more about Sarah, head to the CKC blog for all the details.
Now we can get to the pretty stuff. To start, here is our inspiration kit. It is Bee-utiful Day Kit kit by Jennifer Fehr over at sweetshoppedesigns.com. Our CKC team member hosting this kit, Jody, appreciated the boldness of the kit.
I’ve been using plenty of black and enough yellow lately so I was a tad hesitant. But when I looked closer at the floral pattern papers and the cardstock color palette I knew I had plenty to work with. Throw in the add-on mixed media pack and I was golden.
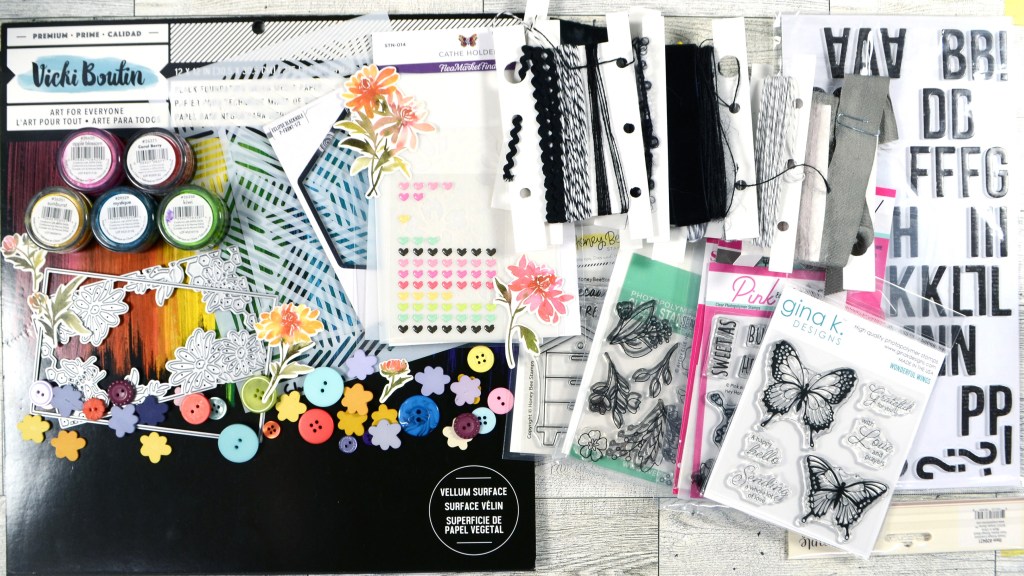
So these are the papers I came up with. I leaned into some of the bee theme, included yellows and also gave a nod to the geometrics and woodgrains in the pattern paper graphic. It is easy to miss some of those smaller details when you have such a bold cover image. Be sure to take your time when checking out inspiration. You never know what small things will catch your attention.
I included the black the most in my embellishments. I have black mixed media paper by Vicki Boutin to do watercolor and inking techniques on. Plus I added black fibers & ribbons. That will give me enough black to work with and not be overwhelmed.
Don’t forget that each month I also create my own elements to add into my kit. This time you’ll get to see those coloring on top of black paper techniques!
There is a tradition over at CKC of titling our kits just like companies do. So I’m calling mine…
The Bees Knees
If you want more details on my kit building thought process, check out my kit build video.
I hope you can follow along with the other designers and see how they interpreted their own kits.
Have fun kit building and don’t forget to show off your stuff over on the CKC Facebook group, or tag us on Instagram @counterfeitkitchallenge or use #counterfeitkitchallenge.
I’ll be back on the 4th, for our Product Forgeries. Until then, have an artful day!
^^ Disclaimer: I offer affiliate shopping linked products when possible. This shopping won’t cost you anything extra, but I get a small kick back from the companies for sending business their way. It is an easy way to tell me “Thank You” for the content I provide. I appreciate you using my links!